Why We need Cloud PKI
Use Microsoft Cloud PKI to issue certificates for Intune-managed devices. This cloud service automates certificate lifecycle management, removing the need for on-premises servers or hardware. It provides a dedicated PKI for your organization, handling certificate issuance, renewal, and revocation across all Intune-supported platforms.What is Microsoft Cloud PKI
public key infrastructure (PKI) uses digital certificates to authenticate and encrypt data between devices and services, securing scenarios like VPN, Wi-Fi, email, web, and device identity. However, managing PKI certificates can be challenging, costly, and complex, especially for organizations with many devices and users. Microsoft Cloud PKI enhances device and user security, boosts productivity, and supports digital transformation to a fully managed cloud PKI service. It also reduces workloads for Active Directory Certificate Services (ADCS) or private on-premises certification authorities.Platform Supported
- Android
- iOS/iPadOS
- macOS
- Windows
Licensing requirements
- Microsoft Intune Suite license
- Microsoft Cloud PKI standalone Intune add-ons license
Role-Based Access Control
The following permissions can be assigned to custom Intune roles, allowing users to view and manage CAs in the admin center:Read CAs: Users with this permission can view the properties of a CA.
Create Certificate Authorities: Users with this permission can create a root or issuing CA.
Revoke Issued Leaf Certificates: Users with this permission can manually revoke a certificate issued by an issuing CA. This permission also requires the Read CA permission.
Microsoft Cloud PKI Features
| Feature | Overview |
|---|---|
| Create multiple CAs in an Intune tenant | Create a two-tier PKI hierarchy with root and issuing CA in the cloud. |
| Bring your own CA (BYOCA) | Anchor an Intune Issuing CA to a private CA through Active Directory Certificate Services or a non-Microsoft certificate service. Maintain the same root CA and create an issuing CA that chains to your external root. Supports external private CA N+ tier hierarchies. |
| Signing and Encryption algorithms | Intune supports RSA, key sizes 2048, 3072, and 4096. |
| Hash algorithms | Intune supports SHA-256, SHA-384, and SHA-512. |
| HSM keys (signing and encryption) | Keys are provisioned using Azure Managed Hardware Security Module (Azure Managed HSM). CAs created with a licensed Intune Suite or Cloud PKI Standalone Add-on automatically use HSM signing and encryption keys. No Azure subscription is required for Azure HSM. |
| Software Keys (signing and encryption) | CAs created during a trial period of Intune Suite or Cloud PKI standalone Add-on use software-backed signing and encryption keys using System.Security.Cryptography.RSA. |
| Certificate registration authority | Providing a Cloud Certificate Registration Authority supporting Simple Certificate Enrollment Protocol (SCEP) for each Cloud PKI Issuing CA. |
| Certificate Revocation List (CRL) distribution points | Intune hosts the CRL distribution point (CDP) for each CA. The CRL validity period is seven days. Publishing and refresh happens every 3.5 days. The CRL is updated with every certificate revocation. |
| Authority Information Access (AIA) end points | Intune hosts the AIA endpoint for each Issuing CA. The AIA endpoint can be used by relying parties to retrieve parent certificates. |
| End-entity certificate issuance for users and devices | Also referred to as leaf certificate issuance. Support is for the SCEP (PKCS#7) protocol and certification format, and Intune-MDM enrolled devices supporting the SCEP profile. |
| Certificate life-cycle management | Issue, renew, and revoke end-entity certificates. |
| Reporting dashboard | Monitor active, expired, and revoked certificates from a dedicated dashboard in the Intune admin center. View reports for issued leaf certificates and other certificates, and revoke leaf certificates. Reports are updated every 24 hours. |
| Auditing | Audit admin activity such as create, revoke, and search actions in the Intune admin center. |
| Role-based access control (RBAC) permissions | Create custom roles with Microsoft Cloud PKI permissions. The available permissions enable you to read CAs, disable and reenable CAs, revoke issued leaf certificates, and create certificate authorities. |
| Scope tags | Add scope tags to any CA you create in the admin center. Scope tags can be added, deleted, and edited. |
Microsoft Cloud PKI Architecture
Microsoft Cloud PKI simplifies public key infrastructure management with key components: a Cloud PKI service for creating and hosting certification authorities, and a certificate registration authority for automatic handling of Intune-enrolled device requests, supporting SCEP.Architectural Components
- A - Microsoft Intune
- B - Microsoft Cloud PKI servicesB.1 - Microsoft Cloud PKI service
- B.2 - Microsoft Cloud PKI SCEP service
- B.3 - Microsoft Cloud PKI SCEP validation service
Ref: Microsoft
Note: These components replace the need for an on-premises certificate authority, NDES, and Intune certificate connector.
Note: These components replace the need for an on-premises certificate authority, NDES, and Intune certificate connector.
Practical CA Configuration Examples
Two-tier Cloud PKI root and issuing CAs, along with bring-your-own CAs, can coexist in Intune. Example configurations for creating CAs in Microsoft Cloud PKI include:- One root CA with five issuing CAs
- Three root CAs with one issuing CA each
- Two root CAs with one issuing CA each, plus two bring-your-own CAs
- Six bring-your-own CAs
Cloud PKI Deployment
You have two deployment options for Microsoft Cloud PKI:Microsoft Cloud PKI Root CA: Deploy with root and issuing CAs in the cloud, creating a private two-tier hierarchy within a single Intune tenant. Multiple issuing CAs subordinate to the root CA issue certificates to Intune-managed devices using the SCEP certificate profile.
Bring Your Own Certification Authority (BYOCA): Deploy with your own private CA. This requires creating an issuing CA in the cloud, private to the Intune tenant, anchored to a private CA like ADCS. A certificate signing request (CSR) is created in Intune and signed by your private CA.
In this blog, I will demonstrate how to deploy a Microsoft Cloud PKI Root CA and Issuing CA (2 Tier Architecture).
Create Root CA Using Intune Portal
A certification authority basically responsible for the below actions
- Verifies the identity of a certificate requestor
- Issues certificates
- Manages certificate revocation
Microsoft Cloud PKI supports:
- Root CA
- Issuing CA
Lets Create our Root CA First
Log in to the Microsoft Intune admin center.
Navigate to Tenant Administration > Cloud PKI, and select Create.
CA Type: Choose Root CA.
Validity Period: Select 5, 10, 15, 20, or 25 years. In our case we select 5years
Validity Period: Select 5, 10, 15, 20, or 25 years. In our case we select 5years
In our Case we will select all the Options, Except Custom Selection
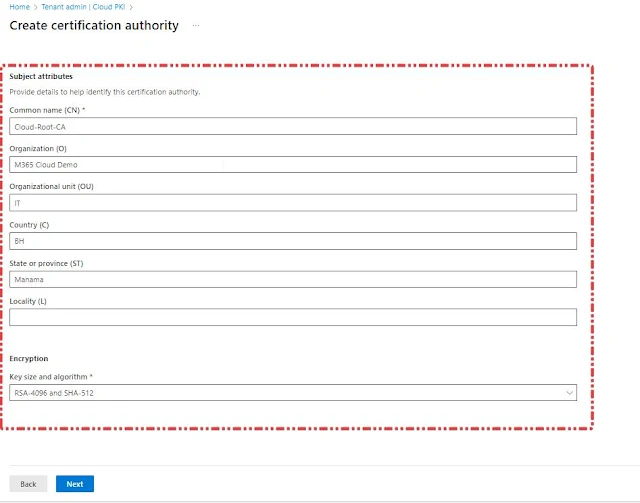
Note: To mitigate potential security risks, ensure you select the appropriate Key Usage.Under Subject attributes, enter a Common Name (CN) for the root CA. Optionally, you can also specify other attributes, including:
- Organization (O)
- Country (C)
- State or Province (ST)
- Locality (L)
To comply with PKI standards, Intune enforces a two-character limit for the country/region code.
Under Encryption, enter the Key Size and Algorithm. Your options are:
- RSA-2048 and SHA-256
- RSA-3096 and SHA-384
- RSA-4096 and SHA-512
Note: This setting enforces the maximum key size and hash algorithm that can be used when configuring a device configuration SCEP certificate profile in Intune. It allows you to select any key size and hash algorithm up to the limit set on the Cloud PKI issuing CA.
Our Current selections you can see in the below screenshot. Select Next to Continue with the Configuration
Note: You can't edit these properties after creating the CA. If changes are needed, select Back to adjust the settings to meet your PKI requirements. To add additional Extended Key usage's later, you must create a new CA.
Create Issuing CA Using Intune Portal
An issuing CA is needed to issue certificates for Intune-managed devices. Cloud PKI provides a SCEP service as a certificate registration authority, requesting certificates from the issuing CA for Intune-managed devices using a SCEP profile.Intune Portal Navigate to Tenant Administration > Cloud PKI, and select Create.
Set up the following configurations for the Issuing CA:
CA Type: Choose Issuing CA.
Root CA Source :Intune ;This setting determines the root CA anchoring the issuing CA.
Root CA: Select one of the root CAs created in Intune to anchor. In our case it is Cloud-Root-CA
For Validity period: select 2, 4, 6, 8, or 10 years. The issuing CA's validity period can't exceed that of the root CA. To set a custom validity period, use the Microsoft Graph API.
In our Case we choose 2Years
For Extended Key Usages, select the intended use of the CA. CAs are limited to specific uses to prevent security risks.
We will select the same usage which we selected for Root CA; Refer to the screenshot below for the selection.
Note: You can only select Extended Key Usages defined in the root CA. Undefined EKUs in the root CA won't appear as options.
Under Subject attributes enter a Common name (CN) for the issuing CA- Organization (O)
- Organizational unit (OU)
- Country (C)
- State/province (ST)
- Locality (L)
Review the summary. When ready, select Create.
Note: You can't edit these properties after creating the CA. Select Back to make changes. For additional EKUs later, you'll need to create a new CA.
Return to the Microsoft Cloud PKI CA list in the admin center and select Refresh to view your new issuing CA.
Click on the Root CA, in this case, "Cloud-Root-CA," to view its properties. Then download and save the Root-CA certificate to deploy it to the Client Trusted Root Certificate Authorities store.
We'll do the same for our Issuing CA. Click on the Issuing CA to open its page, where you'll see two tabs: Monitor and Properties.
Properties Tab: This tab shows the Issuing CA properties such as:
- CA Settings
- Certificate Revocation List (CRL) distribution point URI
- Authority Information Access (AIA) URI
- SCEP URI (issuing CA only)
Take note of these endpoint locations for future reference, as relying parties need network visibility to them. For instance, you'll need the SCEP URI endpoint when creating SCEP profiles.
Note: The CRL is valid for 7 days and is refreshed and republished in the admin center every 3.5 days. Additionally, it is updated whenever an end-entity certificate is revoked.
Create Intune Cloud PKI Certificate Profile for Endpoint Devices
To create the trusted certificate profile for Cloud PKI, you need the public keys for both the root CA and issuing CA certificates. These public keys establish a trust chain between Intune-managed devices and Cloud PKI when requesting certificates via SCEP profiles. Download the public keys for each CA and ensure they are installed on any relying parties or authentication endpoints supporting certificate-based authentication.To issue certificates, you must:
- Create a trusted certificate profile for the Cloud PKI root CA.
- Create a trusted certificate profile for the Cloud PKI issuing CA.
- Create an SCEP certificate profile for the Cloud PKI issuing CA.
Create Windows Trusted Certificate Profile
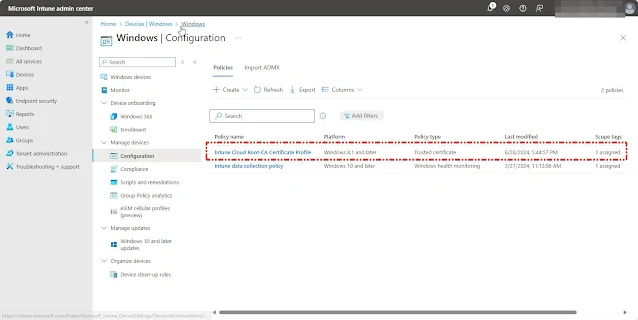
Open the Intune Admin Center by navigating to https://intune.microsoft.com Click on Devices, select Windows, then choose Configuration. Click Create and select Create New Policy.Note: Create one trusted certificate profile for the root CA certificate and one for the issuing CA.
Select Platform as Windows 10 and Later, choose Profile Type as Template, and type Trusted Certificate in the search box. select Trusted Certificate Template Name and Click Create
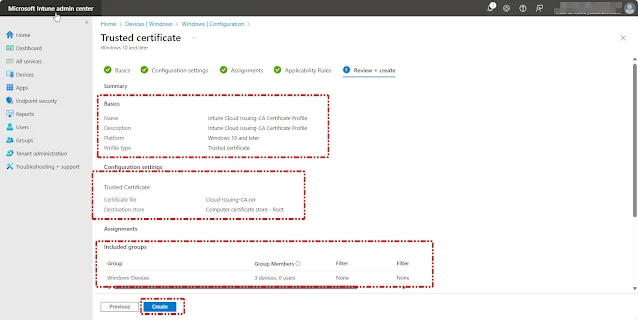
In the Template Configuration Menu, enter a Name and Description for the Trusted Certificate Profile and click Next
On the Configuration Settings page, upload the Intune Cloud-Root-CA Certificate that was downloaded earlier. Then, set the Destination Store to Computer Certificate Store-Root and Click Next
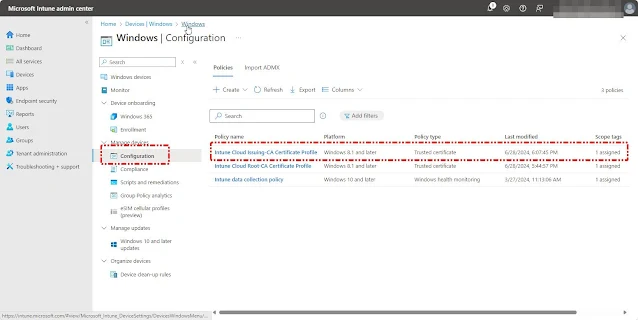
Windows Configuration Page Click Create and select Create New Policy.
Select Platform as Windows 10 and Later, choose Profile Type as Template, and type Trusted Certificate in the search box. select Trusted Certificate Template Name and Click Create
In the Template Configuration Menu, enter a Name and Description for the Trusted Certificate Profile and click Next
On the Configuration Settings page, upload the Intune Cloud-Issuing-CA Certificate that was downloaded earlier. Then, set the Destination Store to Computer Certificate Store-Root and Click Next
Create Intune SCEP Certificate Profile for Windows
Create an SCEP certificate profile for each targeted OS platform.In our case we are going to Create SCEP Profile for Windows Devices. The SCEP certificate profile is used to request a leaf client authentication certificate from the issuing CA. This certificate is essential for certificate-based authentication scenarios, such as Entra ID Certificate based authentication, Wi-Fi and VPN access.Before creating the SCEP profile, we need to copy the SCEP URI. To do this:
Open the Intune Portal and navigate to Tenant administration > Cloud PKI.
Select the Issuing CA, in our case "Cloud-Issuing-CA".
Go to Properties.
Next to the SCEP URI property, select Copy to clipboard.
Select the Issuing CA, in our case "Cloud-Issuing-CA".
Go to Properties.
Next to the SCEP URI property, select Copy to clipboard.
Select Platform as Windows 10 and Later, choose Profile Type as Template, and type SCEP Certificate in the search box. select SCEP Certificate Template Name and Click Create
In the Template Configuration Menu, enter a Name and Description for the SCEP Profile and click Next
Certificate type: User
- User: User certificates can contain both user and device attributes in the subject and SAN of the certificate.
- Device: Device certificates can only contain device attributes in the subject and SAN of the certificate.
Subject name format: CN={{UserName}},E={{EmailAddress}}
Enter text to tell Intune how to automatically create the subject name in the certificate request. Options for the subject name format depend on the Certificate type you select, either User or Device.
User Certificate Type Variables for Subject Name Format
To customize the subject name format, use the text box to enter static text and variables. Supported variables include:
Email (E): Typically set with the `{{EmailAddress}}` variable, e.g., `E={{EmailAddress}}`.
Common Name (CN): Can be set using various variables:
- `CN={{UserName}}`: The user's name, like testuser.
- `CN={{UserPrincipalName}}`: The user principal name, like testuser@testdomain.com.
- `CN={{AAD_Device_ID}}`: An ID for device authentication in Microsoft Entra ID.
- `CN={{DeviceId}}`: An ID for devices enrolled in Intune (avoid using this for Windows devices, as it can cause sync issues).
- `CN={{SERIALNUMBER}}`: The device's unique serial number.
- `CN={{IMEINumber}}`: The unique IMEI number for mobile phones.
- `CN={{OnPrem_Distinguished_Name}}`: A sequence of relative distinguished names,
e.g., `CN=Test User,OU=UserAccounts,DC=HQ,DC=testdomain,DC=com`.
To use `{{OnPrem_Distinguished_Name}}`, sync the `onpremisesdistinguishedname` user attribute via Microsoft Entra Connect. If it contains a comma, enclose the format in quotes: `CN="{{OnPrem_Distinguished_Name}}"`.
- CN={{OnPremisesSamAccountName}}: Sync the `samAccountName` attribute via Microsoft Entra Connect. This is the user sign-in name, formatted as `DomainName\testUser` or `testUser`.
Device variables from the Device certificate type section can also be used in user certificate subject names.
Combine these variables with static text to create a custom subject name format, such as: `CN={{UserName}},E={{EmailAddress}},OU=Device,O=HR Group,L=Redmond,ST=Washington,C=US`.
Device Certificate Type Variables for Subject Name Format
When configuring the subject name format for device certificates, you can use the following variables:
- `{{AAD_Device_ID}}` or `{{AzureADDeviceId}}`: Identifies a device by its Microsoft Entra ID.
- `{{DeviceId}}`: The Intune device ID.
- `{{Device_Serial}}`, `{{SerialNumber}}`: Device serial number.
- `{{Device_IMEI}}`, `{{IMEINumber}}`, `{{IMEI}}`: Device IMEI number.
- `{{WiFiMacAddress}}`: Device WiFi MAC address.
- `{{DeviceName}}`: Name of the device.
- `{{FullyQualifiedDomainName}}`: (Only for Windows and domain-joined devices)
- `{{MEID}}`: Device MEID.
Example: To set the common name for a device named Device1, use `CN={{DeviceName}}Device1`.
Important: Enclose variable names in double curly brackets `{{ }}` to avoid errors. For instance, `CN={{DeviceName}}`.
Note:
- Device properties in the subject or SAN of a certificate, such as IMEI and SerialNumber, can be spoofed if someone has access to the device.
- A device must support all specified variables for the certificate profile to install. For example, if `{{IMEI}}` is used and the device lacks an IMEI number, the profile installation will fail.
Subject Alternative Name (SAN)
Configure how Intune automatically creates the Subject Alternative Name (SAN) in certificate requests. You can specify multiple SANs, selecting from four attributes and adding a text value, which can include variables and static text:- Email address
- User Principal Name (UPN)
- DNS
- Uniform Resource Identifier (URI)
User Certificate Type:
Use any user or device variables described in the Subject Name section. For example, include the UPN in the SAN for client certificates used to authenticate to a Network Policy Server.
Device Certificate Type:
Use any variables described in the Device certificate type section. For instance, specify a value like `{{AzureADDeviceId}}.domain.com` for the DNS attribute, or `{{FullyQualifiedDomainName}}User1@Contoso.com` for an Email address.
By combining these variables with static text, you can create a custom SAN format, such as `{{UserName}}-Home`.
Certificate validity period:
You can enter a value that is lower than the validity period in the certificate template, but not higher. Intune supports a validity period of up to 24 months.In our case we will select 3 Months
Key storage provider (KSP):
Specify where the key to the certificate is stored. We will use the following Value- Enroll to Trusted Platform Module (TPM) KSP if present, otherwise Software KSP
Key usage:
We will select the below valuesDigital signature: Allow key exchange only when a digital signature helps protect the key.
Key encipherment: Allow key exchange only when the key is encrypted
Key encipherment: Allow key exchange only when the key is encrypted
Key size (bits):
We will use 2048 as Key Size
Hash algorithm:
We will Use SHA-2
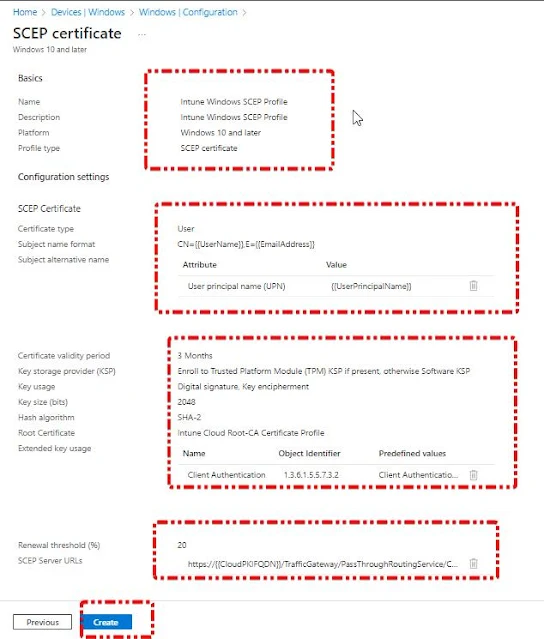
The Final settings you can see in the Below screenshot
Select the previously configured and assigned trusted certificate profile for this SCEP certificate profile. This profile provisions users and devices with the Trusted Root CA certificate.
Note: For a multi-level PKI infrastructure (e.g., Root and Issuing Certification Authorities), select the top-level Trusted Root certificate profile that validates the Issuing CA.
Note: For a multi-level PKI infrastructure (e.g., Root and Issuing Certification Authorities), select the top-level Trusted Root certificate profile that validates the Issuing CA.
Extended key usage:
Specify the certificate's purpose, usually client authentication for user or device server authentication. Additional key usages can be added as needed. In our case, select "Client Authentication (1.3.6.1.5.5.7.3.2)" from the Predefined values drop-down box.
Renewal threshold (%):
Enter the percentage of the certificate's lifetime that should remain before the device requests renewal. For instance, if you enter 20, the renewal process will start when 80% of the certificate's validity period has elapsed. Renewal attempts will continue until successful, generating a new certificate with a new public/private key pair. In our case, we will set this to 20%.
SCEP Server URLs:
We will use our Cloud PKI Issuing CA SCEP URI.
The settings should look as shown in the screenshot below.Note: If you assign this SCEP profile only to a user group, the policy status will show as Pending.
Then click Next to assign Applicability Rules. In our case, we are not considering Applicability Rules. Click Next to review the settings.
Then click Next to assign Applicability Rules. In our case, we are not considering Applicability Rules.
Verifying User Certificate Issuance
After deploying your certificate, the Root and Issuing CA certificates should appear in the Trusted Root Certification Authorities store, and the User certificate should be in the User certificate store on your Windows device. To verify, search for "Run" in your Windows search bar and type `certmgr.msc`.
You should see the Root and Issuing CA certificates in the Trusted Root Certification Authorities store.
Under Personal Certificates, you will see your user certificate issued for your Entra ID user account.
Conclusion
Deploying Intune Cloud PKI and testing end-user certificate issuance is a crucial step in ensuring secure, certificate-based authentication for your organization's devices and users. By following the outlined steps, you can successfully configure and deploy both Root and Issuing CAs, set up SCEP profiles, and verify the deployment of certificates on Windows devices. This process enhances security, enables seamless access to network resources, and ensures compliance with industry standards. Regular testing and validation of the certificate issuance process ensure that your PKI infrastructure remains robust and reliable, providing a solid foundation for secure communications and data protection within your enterprise.










0 Comments