Introduction
In this Blog, we will walk through the steps required to integrate Beyond Identity(IdP) as a passwordless authentication solution for an Entra ID Environment. This includes configuring Entra ID to use Beyond Identity as an Identity Provider, setting up the Beyond Identity Admin Console and User Console applications in Entra ID, and configuring SCIM-based provisioning from Entra ID to Beyond Identity Cloud.
Prerequisites
Before you begin, ensure you have the following:3. Windows Machine: A machine that has Administrator rights and PowerShell\Graph modules for configuring federated authentication, Setting immutableId for Entra ID users, and creating users after federation.
Setting Up Beyond Identity in Entra ID
Domain Configuration
An alternative domain is advised for testing by Beyond Identity.You need to select a domain to use. You can use a domain that you have already, or buy a new one from any Domain Registrar.
Use the instructions on this page to set up this domain as a Custom Domain in M365.
https://learn.microsoft.com/en-us/microsoft-365/admin/setup/add-domain?view=o365-worldwide
Entra ID User Configuration
To set up users in Entra ID ,Sign in to M365 Admin Portal with a Global Administrator account. Go to admin.microsoft.com> Users >Active Users> Select Add user.
Enter the user information and create the user.Install-Module MSOnline
(Install MSOnline Powershell Module, if it is not already installed)
Connect-MsolService
$upn = “user@abc.com”
$user = Get-MsolUser -UserPrincipalName $upn
$uuid = [system.convert]::ToBase64String(([GUID]$user.objectID.Guid).ToByteArray())
Set-Msoluser -UserPrincipalName $upn -ImmutableID $uuid
Entra ID Group Configuration (Optional)
Create groups for managing Beyond Identity service assignments:Create Groups
Navigate to entra.microsoft.com > Groups >All groups> New Group.
Create Group Named BI_Admins , BI_Users, and BI_Push_Groups with appropriate settings.
Add members to these groups.
BI_Admins group can be used for Admin users
BI_Users group can be used for User Provisioning in Beyond Identity
BI_Push_Groups can be used for pushing Policies
Setup Beyond Identity Admin Console Application in Entra ID
Setting Up an Enterprise Application
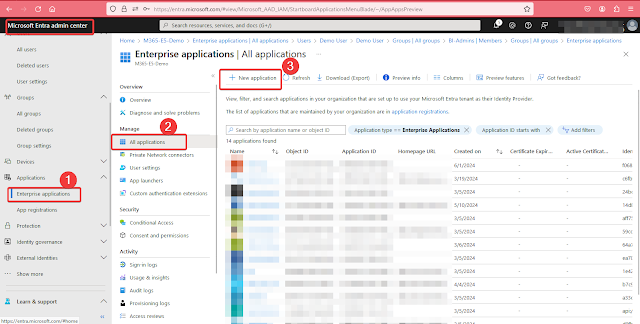 Find and choose “Beyond Identity Admin Console” from the App Gallery and click Create.
After creating the application, go to the application page and choose Users and Groups. Then, assign the BI_Admins group that we made before.
You can also choose an Application Owner if needed
Login to Beyond Identity Admin Console by visiting https://admin-eu.byndid.com and click on “Log in with Beyond Identity”. (Currently we are using Europe Datacenter, Login URL May changed based on your Beyond Identity Datacenter)Once Log in to Admin Console go to Settings.On the Settings page, choose the Console Login tab.
In the “Admin Console SSO Integrations” section, select “Edit SSO” for the Custom SAML SSO and record SAML Connection ID from Beyond Identity Admin Consoleand return to Entra ID Portal perform following steps.In Entra ID Portal>Enterprise Applications>Select >Beyond Identity Admin Console>Select “Single Sign-on” from the left side menu and then choose “SAML” as a single sign-on method.
On the “Set up Single Sign-on with SAML” page, click “Edit” on “Basic SAML Configuration” and update the following settings
Identifier (Entity ID): https://admin-eu.byndid.com/auth/saml/<connection-id>/sso/metadata.xml
Reply URL (ACS URL): https://admin-eu.byndid.com/auth/saml/<connection-id>/sso
Mark newly added “Entity ID” and “Reply URL” as default.
Delete “Sample Entity ID”.
Setup Beyond identity Admin Console SSO in Beyon Identity Portal
After logging in to Admin Console, go to Settings.
On the Settings page, select the Console Login tab.
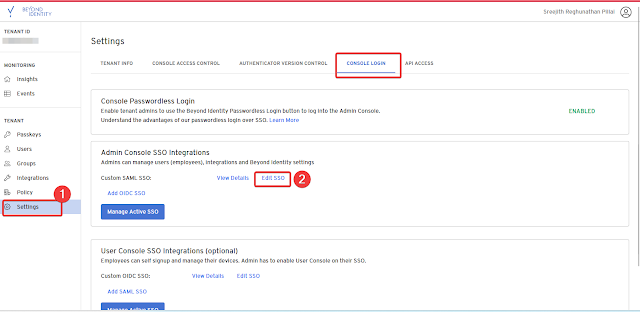
Name the Configuration in the Name Section and check that the URLs below are correct,
IDP Url: https://login.microsoftonline.com/<azure-tenant-id>/saml2
IDP Entity ID: https://sts.windows.net/<azure-tenant-id>/
You can find these Values in the Beyond Identity Admin Console session configuration of your enterprise applications in Entra ID portal
Remaining settings you can keep as below.· Name ID Format: emailAddress
· Subject User Attribute: UserName
· Request Binding: http redirect
The Federation Metadata XML will update the X509 Signing Certificate, or you can upload the certificate that you download from the Entra ID portal instead.
Once these values are set up, use SSO to access the Beyond Identity Admin Console and verify that the admin (user from the BI_Admins group) can enter the Beyond Identity Admin Console.
Setup Beyond
Identity User Console Application in Entra ID
Go to entra.microsoft.com In Enterprise Applications, make a new non-gallery application called “Beyond Identity User Console”.
Choose> Beyond Identity User Console -> Properties page and add the Beyond Identity logo. (Optional: This makes it easier to recognize BI Apps).
You can also assign the Application owner in the same Application Owner Tab
Tenant URL: https://api-eu.byndid.com/scim/v2/
(The Europe Datacenter is our current location, but the Configuration URL might vary by your Beyond Identity Datacenter)
To get the token, go to Beyond Identity Admin Portal and select the Settings Tab and then API Access
Leave the Expires tab with the default settings and select Create Client Credentials
To create a SCIM token, click on the name of the Client credentials you created, then go to the Tokens Tab and click on create Token.
Give it a name and copy the generated token.
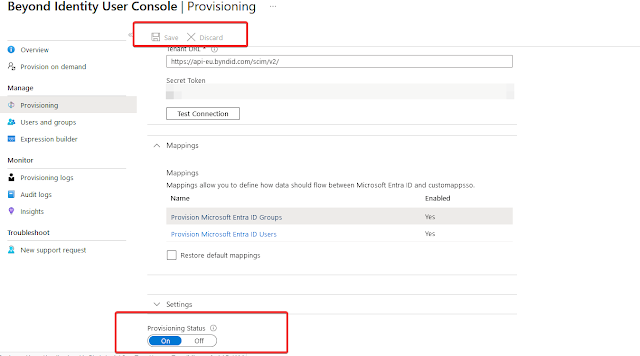
You can paste this token in your Entra ID Application for user provisioning. Once Token and Tenant URL is pasted Click on “Test Connection”. After successful SCIM connection test, click on “Save”.
On the "Mappings" Tab
Make sure "Provisioning Azure Active Directory Groups" is turned on.
Make sure "Provisioning Azure Active Directory Users" is turned on.On the "Settings" Tab
Choose "Send an email notification when a failure occurs" and enter a valid email address for IT admin.
Choose Accidental deletion threshold and you can set the desired Value, we chose 10 in our case
Scope: "Sync only assigned users and groups"
Click on "Save".Provisioning Status: On
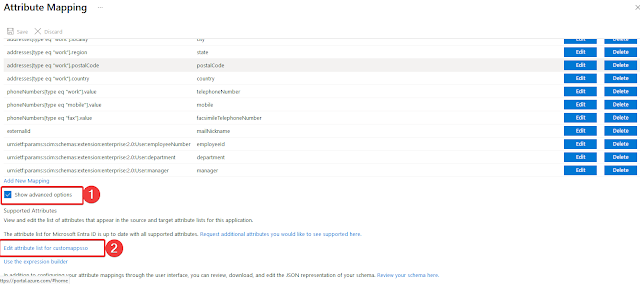
To change the Attribute Mappings, do this:
Click on Mappings
Click on “Entra ID Users”Enable “Create”, “Update” and “Delete” for “Target Object Actions”Select “Show Advanced Options” and click on “Edit Attribute list for customappsso”
Make sure these settings are correct:
id: Primary key, Required Set
active: Required
displayName: Required
emails (work): Required, Multi-Value
username: Required
name.givenName: Required
name.familyName: Required
externalId: Required
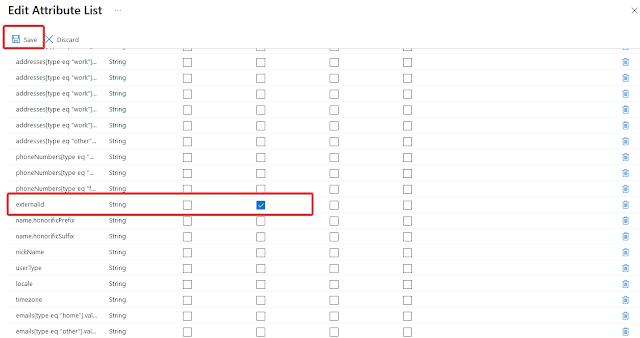
Click on “Save”
Only keep these 7 attributes in the “Attribute Mappings” list, and remove the others. Also, if any of these attributes are not there, add them manually
username,active,displayName,emails (work),name.givenName,name.familyName,externalId
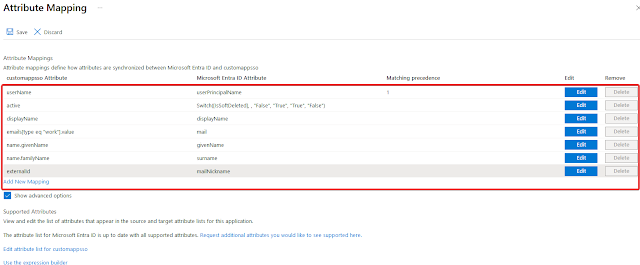
Go to the "Attribute Mappings" list and select Edit for the externalId. Change the following settings:
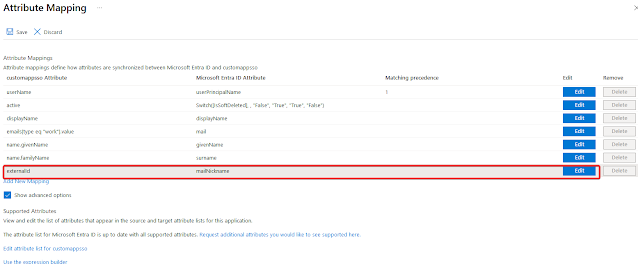
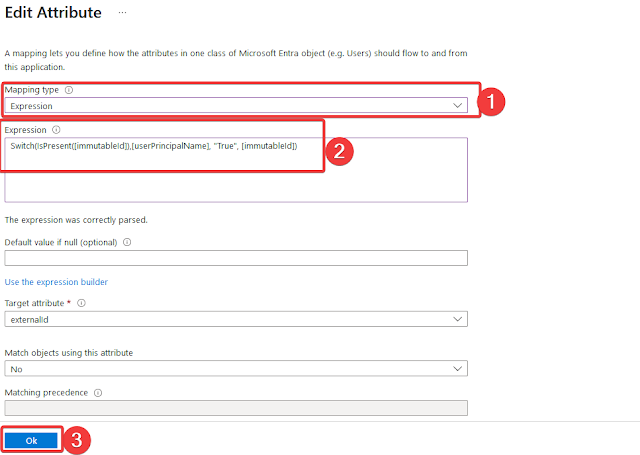
Mapping Type: Expression
Expression: Switch(IsPresent([immutableId]),[userPrincipalName], "True", [immutableId])
Keep the rest of the fields as default and click on "OK".
On the "Provisioning" page, click on "Save".Return to the application and select “Users and groups” from the left menu. Then select “Add user/group” and choose the “BI_Users” and “BI_Push_Groups” group. Select “Assign”. If group creation is not allowed by the Entra ID license, then assign users to this application one by one.In the search bar at the top, look for “App registrations”, then select “All Applications”, then pick “Beyond Identity User Console”.
On the “Overview” page, write down “Application (client) ID”. You will need it in future steps.
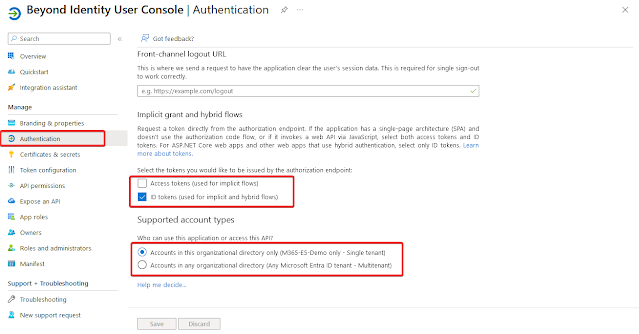
On the “Overview” page, write down “Directory (tenant) ID”. You will need it in future steps.On the “Authentication” page under Platform Configuration -> Add a platform and Choose “Web” and enter:
Redirect URI: https://user-eu.byndid.com/auth-user/callback(We use the Europe Datacenter right now, but the Configuration URL may change depending on your Beyond Identity Datacenter)Implicit grant and hybrid flows: Select “ID Tokens”
Support Account Type: “Accounts in this organizational directory only (Single Tenant)”
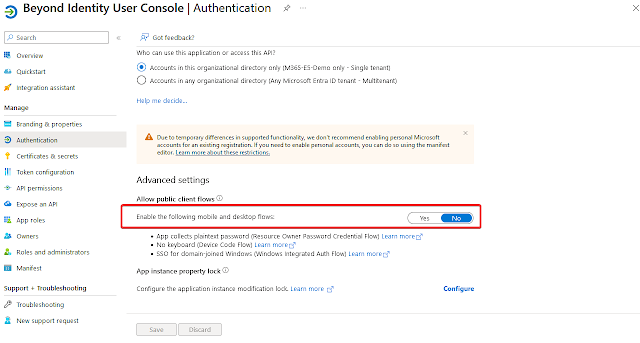
Under “Advanced Settings” for “Allow public client flows” select “No”.
Click on “Save”.
select the “Beyond Identity User Console” App.
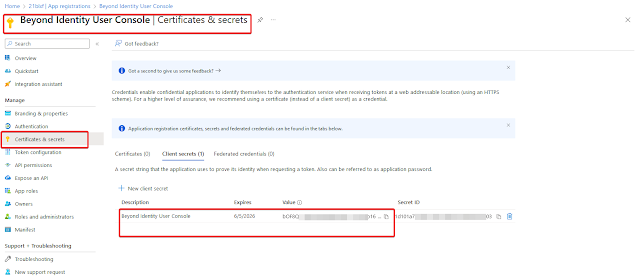
Click on “Certificates and Secrets” and choose “New client secret”.Enter “Beyond Identity User Console” in the “Description” field and choose “24 Months” for the “Expires” field.Copy the Client Secret from the “Value” column. You will need it later.
No need to modify the “Token Configuration” page.
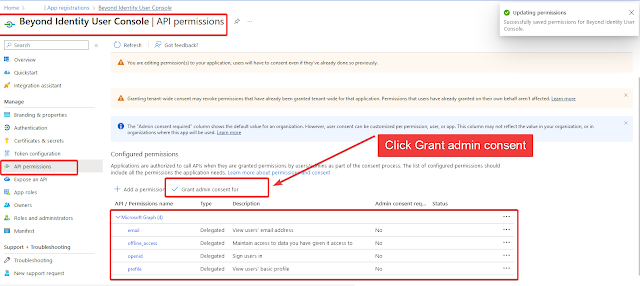
Go to the “Beyond Identity user Console” App page under App Registrations and click on “API permissions”.Click on “Add a Permission”.
Choose “Microsoft Graph APIs”.
Choose “Delegated Permissions”.
Choose OpendID permissions and then choose “email”, “offline_access”, “openid”, and “profile”.
Click on “Add Permissions”Click on “Grant admin Consent for <Tenant Name>” and then click on “Yes” to give consent.
 No need to change the “Expose an API” page.
No need to change the “App Roles” page.
Setup Beyond Identity User Console in Beyond Identity Portal
Go to Beyond Identity Admin UI and select Settings Tab. Select Console LoginUnder User Console SSO Integrations" and "Edit SSO" for OIDC SSO.
Enter the SSO details like this and in the picture:Name: <SSO name> e.g. Entra ID SSO
Client ID: <Value from previous step>
Client Secret: <Value from previous step>
Issuer: https://sts.windows.net/<Azure-AD-Tenant-ID>/ (Keep the slash)
Token Field: upn
Token Field Lookup: user name
Scope: AllNote: 1. After SCIM User Provisioning, the user receives a Welcome email from Beyond Identity with instructions to Download the Application and set up the Credentials. We will demonstrate this at the end of this session.
2. SCIM Provisioning runs every 40 minutes. You can also provision on-demand by going to the Beyond Identity user console application as needed.
Setup Beyond Identity Console for User Authentication (WS-FED federation)
Log in to Beyond Identity Admin Console UI and go to the “Integrations” tab. Click on “WS-FED” and then “Add WS-FED Connection”.Fill in the fields as follows:Name: Entra WS-FED(Any name you can choose)
SP Single Sign on URL: https://login.microsoftonline.com/login.srf
SP Audience URI: https://login.microsoftonline.com/<Azure-AD-Tenant-ID>/
Name ID Format: Unspecified
Subject User Attribute: ExternalID
Authentication Context Class: X509Attribute Claims: Name: ImmutableID, Name format: unspecified, Value: {{ExternalID}}, Name space: http://schemas.microsoft.com/LiveID/Federation/2008/05/ImmutableID
Attribute Claims: Name: emailaddress, Name format: unspecified, Value: {{Email}}, Name space: http://schemas.xmlsoap.org/ws/2005/05/identity/claims/emailaddress
Attribute Claims: Name: UPN, Name format: unspecified, Value: {{UserName}}, Name space: http://schemas.xmlsoap.org/claims
Attribute Claims: Name: authnmethodsreferences, Name format: unspecified,
Value (custom string): http://schemas.microsoft.com/claims/multipleauthn
Namespace: http://schemas.microsoft.com/claimsClick on “Save Changes”.
Record the following fields from the WSFED Connection you just created. You will need them in the next step.
IdP Id: (Beyond Identity Connection ID)
IdP Passive Logon URL: https://auth-eu.byndid.com/wsfed/v1/<BI-Connection-ID>/sso
IdP Issuer: https://auth-eu.byndid.com/wsfed/v1/<BI-Connection-ID>
IdP Metadata URL: https://auth-eu.byndid.com/wsfed/v1/<BI-Connection-ID>/sso/metadata.xml
Download IdP Signature Certificate.
Configure Beyond Identity as the Identity Provider (WS-FED Federation)
Use the commands below to configure Beyond Identity as the Identity ProviderLogin to any Windows machine and start a power shell as an administrator.
Issue following PowerShell commands.
Connect-MsolService (Login as Entra ID Global Administrator, you may be required to Install MSOnline PowerShell module using “install-module MSOnline” command)
$domain=”abc.com” (Replace with your actual domain )
$BrandName = "Beyond Identity WS-FED"
$Issuer = “https://auth.byndid.com/wsfed/v1/<BI-Connection-ID>”
$LogOnUrl = “https://auth.byndid.com/wsfed/v1/<BI-Connection-ID/sso”
$mex = “”
$LogOffUrl = “https://portal.azure.com” (or Company website)
$SigningCert = "[BI WSFED X.509 certificate in string format]”
$Protocol = "WSFED"
Set-MsolDomainAuthentication -DomainName $domain -Authentication “managed”
Set-MsolDomainAuthentication -DomainName $domain -Authentication federated -FederationBrandName $BrandName -IssuerUri $Issuer -PassiveLogOnUri $LogOnUrl -MetadataExchangeUri $mex -LogOffUri $LogOffUrl -PreferredAuthenticationProtocol $Protocol -SigningCertificate $SigningCert -SupportsMfa $True
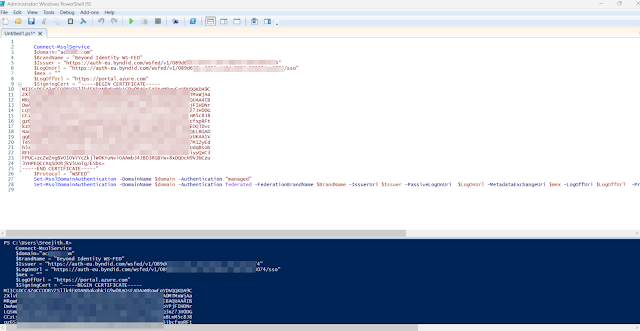 To get Domain federation setting
 Get-MsolDomainFederationSettings -domainname $domain | fl *
Note: After the Primary domain is federated, users in that domain can only be created via PowerShell
To revert domain back to Managed Mode.(Remove Domain Federation)
Set-MsolDomainAuthentication -DomainName $domain -Authentication “managed”
Setting up the User
We can use the Test User that we created earlier for testing.To make a user part of the Beyond Identity experience, add the user to the “BI_Users” Group in Entra ID. (Optional: You need to do this step if you can create the “BI_Users” group in the Entra ID)
Open Entra ID Portal> Enterprise Applications -> Beyond Identity User Console -> Users and groups page:
Click on the “Add user/group”.
Click on “None Selected” under Users and Groups. On the search page, pick the user and click on “Select”. Click Assign.Users who are enrolled will get an email from Beyond Identity that welcomes them to the new Identity Provider.
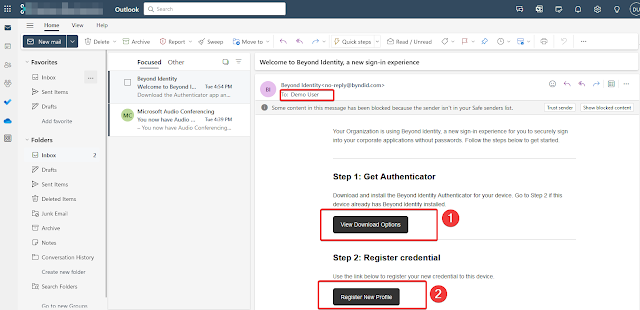
To enroll, users should follow these two steps:
Step 1: Get the Beyond Identity Authenticator app on their device.
When the user clicks “View Download Options”, they should choose and install the app for their platform from the browser page that opens. If they already have the app, they can skip this step.
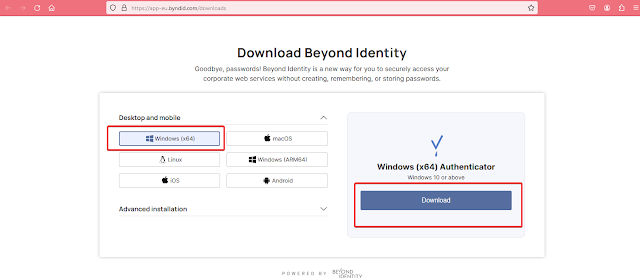 Step 2: Create and register their Credential in the Beyond Identity IdP.
When the user clicks “Register New Credential”, their credential will be created and registered with the Beyond Identity service. The user will also see the credential creation and registration process in the app. When it is done, the user will see the credentials in the app.
See example image below:If the User didn't get the Registration email, Admin can provide the the 9-Character code for the Passkey Registration.
To register a user for a Passkey, navigate to the Users section on the Beyond Identity Admin Page and select the desired user.
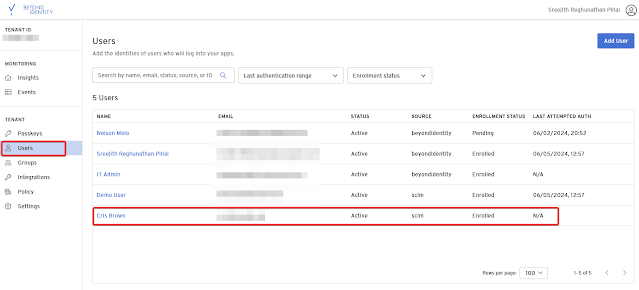
Once User Profile section is opened, Click on Passkeys and then select Enroll a PasskeyOnce Code is Generated you can copy the code, the Code will expire with in 60 seconds.Now go to the Beyond Identity Application on your desktop and Add the Code to register your Passkey
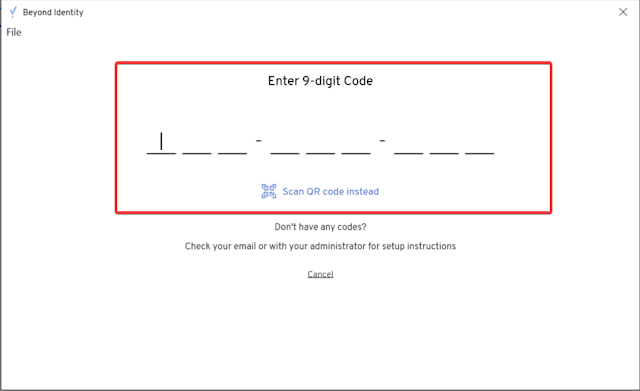
Now you have Successfully registered your Passkey, Lets Login and test User Access.
User Authentication (Signing in)
To sign into their work apps, enrolled users can go to their myapps.microsoft.com (or myapps.company.com or portal.azure.com) site or any app that works with Entra ID SSO. They need to enter their username in the Microsoft app or SSO app.They will see a prompt to use or open the Beyond Identity app to sign in. They should click yes on the prompt and sign in without a password. The Beyond Identity app and a success message will show up.Note: For iOS devices, some apps may ask the user to go back to their app after signing in with Beyond Identity Authenticator.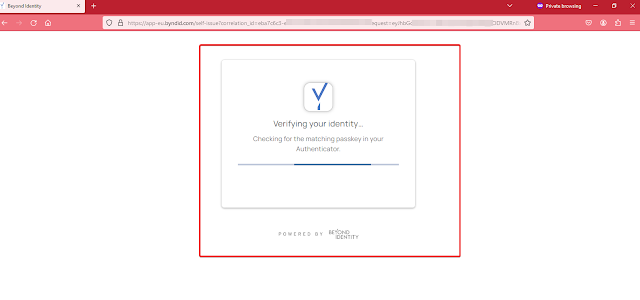
Now you are successfully sign-in with Beyond Identity Passwordless Authentication Method
Create Users in Entra ID with the help of PowerShell once Domain is Federated
To create Entra ID Users after the Primary domain is federated, use the following PowerShell Commands:
Connect-AzureAD
$domain = “contoso.com”
$First_name = "First"
$Last_name = "Last"
$Display_name = $First_name + " " + $Last_name
$UPN = $First_name + "." + $Last_name + "@" + $domain
$Mail_nickname = $First_name + "." + $Last_name
$guid = [guid]::NewGuid()
$immutableid = [system.convert]::ToBase64String(($guid).ToByteArray())
$PasswordProfile = New-Object -TypeName Microsoft.Open.AzureAD.Model.PasswordProfile
$countryCode = "US"
New-AzureADUser -DisplayName $Display_name -PasswordProfile $PasswordProfile -UserPrincipalName $UPN -AccountEnabled $true -ImmutableId $immutableid -GivenName $First_name -SurName $Last_name -mailnickname $Mail_nickname -usageLocation $countryCode
User Deprovisioning
To deprovision a user from the Beyond Identity experience, remove user from the “BI_Users” Group in Entra ID.Right Click on the “BI_Users” group and click on the “Members” tab.
Select User and click on Remove.
In the confirmation dialog click “Yes”.
Click OK.


3 Comments
Great guide. One thing I did not understand why you need BI for passwordless. This can be reached on native EntraID or did I miss a thing?
ReplyDeleteBI incorporates phishing-resistant MFA capabilities through device-bound passkeys, removing the reliance on external devices for authentication. This approach provides strong defense against sophisticated phishing attacks that traditional MFA solutions often fail to prevent. Furthermore, BI utilizes detailed signals from Unified Endpoint Management (UEM) and Mobile Device Management (MDM) tools to enable informed and secure access decisions.
DeleteEmployee Identity Protection is essential for industries like energy and finance. Beyond Identity’s passwordless solutions offer unphishable security, ensuring data and employee access remain safe.
ReplyDelete