Introduction
In the realm of identity and access management, Microsoft Entra ID plays a crucial role in managing user and admin consent. This process is essential for maintaining security and ensuring that applications only access the data and resources they need. This blog delves into the foundational concepts of user and admin consent, exploring the scenarios in which they apply and the settings available to administrators.
Access Scenarios
Determining how your application will access data is essential. There are two primary access scenarios: Delegated access and app-only access.
Delegated Access (User-based access): This scenario involves a user actively signed into the application, which then accesses resources on their behalf. It requires delegated permissions, meaning both the user and the application are separately authorized to access the data. Delegated permissions, also known as scopes, specify the level of access the application has relative to the user's own permissions. For the user, authorization depends on the specific privileges granted, allowing them to access various resources. For instance, a user might be authorized to access directory resources through Microsoft Entra's role-based access control (RBAC), or they could have permissions to access mail and calendar resources via Exchange Online RBAC.
App-Only Access (Service-based access): Here, the application operates independently of any user interaction, ideal for automation or background services. This type of access uses app roles, sometimes referred to as application permissions, which are granted through consent and allow the application to access specific data directly.
Types of Permissions
Delegated Permissions: Used in user-based scenarios, these permissions enable the app to perform actions that the user themselves could. For instance, an app with the delegated permission `Files.Read.All` can read files that the user has access to.
Application Permissions: Used in service-based scenarios, these allow an application to access data independently of user interaction. For example, an app with the `Files.Read.All` application permission can read any file across the tenant.
Comparison of Permission Types
| Permission Types |
Delegated Permissions |
Application Permissions |
| Types of Apps |
Web / Mobile / single-page app (SPA) |
Web / Daemon |
| Access Context |
Get access on behalf of a user |
Get access without a user |
| Who Can Consent |
- Users can consent for their data
- Admins can consent for all users
|
Only admin can consent |
| Consent Methods |
Static: configured list on app registration
Dynamic: request individual permissions at login |
Static ONLY: configured list on app registration |
| Other Names |
- Scopes
- OAuth2 permission scopes
|
- App roles
- App-only permissions
|
| Result of Consent |
OAuth2PermissionGrant |
appRoleAssignment |
Understanding these differences is vital for managing how your application interacts with Microsoft 365 services and ensuring it adheres to security best practices. By configuring access and permissions properly, you can build applications that are not only functional but also secure and compliant with organizational policies.
What is Consent?
Consent is the mechanism by which users or administrators authorize an application to access protected resources. Applications request specific API permissions to function correctly, such as accessing a user’s profile or reading their mailbox. Consent ensures that these permissions are granted appropriately, either by the user or by an administrator, depending on the application’s requirements.
Understanding the importance of user and admin consent is crucial when reading about illicit consent grant attacks in Microsoft 365. User Consent
User consent allows individual users to grant applications access to their data on a per-application basis. This is typically done when the user first signs in to the application and is prompted to grant the necessary permissions. Here’s how user consent works:
- Delegated Permissions: These permissions allow applications to act on behalf of the user, accessing data and resources as if they were the user.
- Consent Process: When a user signs in for the first time, they may see a consent prompt if the application requires permissions that haven’t been granted before. If user consent is allowed in the organization, users can grant these permissions and will not need to consent again on future sign-ins.
- User Consent Settings: Administrators can control whether users can grant consent and under what conditions. Options include allowing consent for verified publishers, restricting consent to specific permissions, or disabling user consent entirely.
Admin Consent
Admin consent involves a privileged administrator granting permissions on behalf of users or the entire organization. This is crucial for applications that require permissions beyond what users can consent to on their own. Key aspects of admin consent include:
- Granting Admin Consent: Administrators can preemptively grant consent for applications, ensuring all users can access them without individual consent prompts. This is often used when acquiring new applications or services.
- Sensitivity: Granting tenant-wide admin consent is a significant action that can provide applications with extensive access to organizational data. Administrators should thoroughly vet applications and their publishers before granting such consent.
- Granular Consent: Administrators can also grant consent on behalf of specific users using tools like Microsoft Graph API and PowerShell, providing flexibility in managing access.
Note:
1. By default, granting tenant-wide admin consent to an application allows all users to access the application unless otherwise restricted. To restrict which users can sign-in to an application, configure the app to require user assignment and then assign users or groups to the application.
2.Granting tenant-wide admin consent can potentially override permissions previously granted at the tenant level for that application. However, permissions that individual users have granted on their own behalf remain unaffected.
Admin Consent Workflow
The admin consent workflow streamlines the process for users to request permissions that they cannot consent to themselves. Here’s how it works:
- Request Process: When users attempt to access an application requiring admin consent, they are presented with an “Approval required” message. They can then submit a request to an administrator, including a justification for the access needed.
- Administrator Review: Designated admins receive notifications of these requests and can approve or deny them. Users are notified of the decision, ensuring they stay informed throughout the process.
Configuring Consent Settings
Administrators can configure various consent policies to align with their organization’s needs. Options include:- Full User Consent: Users can consent to any permissions that do not require admin consent.
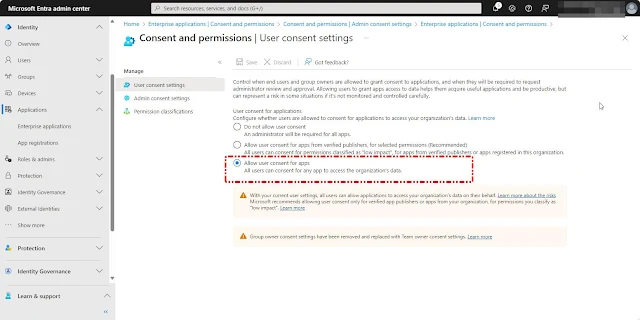
To set up application consent settings in Microsoft Entra ID, log in at Microsoft Entra ID Portal, navigate to Applications, choose Enterprise Applications, and then select Consent and Permissions.
Next, choose User Consent settings. Here, you will find the Default Consent Settings for the tenant, which typically Allow user consent for Apps.- Allowing Specific Permissions: Users can only consent to applications from verified publishers or for permissions classified as low impact.
Permission classifications help you gauge the impact of various permissions based on your organization's policies and risk assessments. You can utilize these classifications within consent policies to determine which permissions users are authorized to consent to on their own.
Three levels of permission classifications are available: "Low", "Medium" (preview), and "High" (preview). Currently, only delegated permissions that do not require administrative consent can be categorized.
The essential permissions required for basic sign-in include openid, profile, email, and offline_access. These are all delegated permissions on the Microsoft Graph, allowing an app to access details from the signed-in user's profile and maintain this access even when the user is not actively using the app.
To set up the permission classification, follow these steps:
Navigate to Permission Classifications.
Select the tab corresponding to the permission classification you wish to modify.
Click on Add permissions to classify additional permissions.
Choose the relevant API and then select the delegated permission(s) you want to classify.
In this example, i have classified the minimum set of permission required for single sign-on:
Note: By default, users can consent to applications for permissions that do not require administrator approval. For instance, users can typically allow an app to access their mailbox, but they cannot authorize unrestricted access for an app to read and write all files across the organization. To minimize the threat of malicious applications deceiving users into granting access to your organization’s data, i advise permitting user consent solely for applications published by a verified publisher.- Disabling User Consent: Users cannot grant permissions to new applications, though they can continue using applications they have already consented to.
When this option is selected, an administrator is required for all apps. Additionally, if the Admin Consent workflow is activated, administrators can receive consent requests from users. This workflow provides a secure method for administrators to grant access to applications needing admin approval. If a user cannot consent to an application, they can submit a request for administrative approval. This request is emailed to designated reviewers. Upon reviewing, the administrator takes action on the request, and the user is then notified of the decision.
Configure Admin consent settings
To set up the Admin Consent Workflow, you must be a Global Administrator.
Here’s how to activate it and select reviewers:
1. Log in to the Microsoft Entra admin center as a Global Administrator.
2. Navigate to Identity > Applications > Enterprise Applications > Consent and Permissions > Admin Consent Settings.
3. Under Admin Consent Requests, set Users can request admin consent to apps they are unable to consent to to Yes.
4. Configure settings:
Who can review admin consent requests: Choose users, groups, or roles as reviewers. Reviewers can handle requests, but only Global Administrators can approve requests for Microsoft Graph app roles.
Email notifications: Enable to alert reviewers of new requests. Request expiration reminders: Activate to notify reviewers when a request is nearing expiration.
Consent request validity: Set the duration that requests remain valid.
5. Save changes. Changes may take up to an hour to apply.
Note: Reviewers can only manage requests made during their tenure. New reviewers won’t see past requests, and removed reviewers will continue to receive reminders for requests made during their term.For organizations with specialized requirements, it's possible to create custom app consent policies that specify detailed conditions for user consent. Currently, setting up these policies can only be done through Graph PowerShell. For more information, please refer to the relevant Microsoft article Manage app consent policies.
User & Admin Consent Experience
Now that we've explored the User & Admin Consent settings and configurations, let's delve into testing the User and Admin Experience for each of the options. Primarily, we have three settings to consider, each with variations based on whether the Admin Consent Workflow is enabled or not:
Allow User Consent for Apps:
1.With Admin Consent Workflow Enabled:
Below Screenshot shows the Tenant Settings Status:
Let's proceed to access an application using a normal user login within our Microsoft 365 services. For this demonstration, we'll integrate Adobe Acrobat for Microsoft Teams. Once added, it will prompt us to authorize and grant the necessary permissions to access user data.
After clicking the "Authorize" button, a new window will open displaying the application name, whether it is from a verified publisher, if it is Microsoft 365 certified, and it will prompt the user to review the application permissions. Select Accept
Since we have successfully authorized the application, it is now ready for use. In this instance, admin consent was not necessary because the application is Microsoft-verified, and the permissions requested were limited to those needed by the individual user who granted consent. Therefore, the admin consent workflow does not apply in this case.Let's now examine the Admin consent workflow using a higher-privileged application. For this test, we will use Microsoft Graph Explorer with a standard user login.
Open Graph Explorer and choose the option for user login.
Once signed in, the user will be prompted to provide consent as shown below. This consent applies only to Graph Explorer login and is not used for any tenant-specific Graph API calls.
Now, to grant permissions in Graph Explorer, click on User Login and select Consent to Permissions.
A new window will appear where you can choose the permissions and request consent. We will use one of these permissions for this consent testing.Once you click the "Consent" button for any of the listed permissions that exceed the current user's access level (in our testing case, we selected `APIConnector.ReadWrite.All`, which requires higher privileges), the user will be unable to grant consent. According to our tenant settings, if a user cannot consent to a permission, an admin is required, and the admin consent workflow must be enabled. Since both configurations are in place, you will be prompted with a window to request admin consent and provide a justification for the request.Once Admin Consent Request is Submitted You will see the Below WindowNow, let’s review and approve the consent request.
Warning: When approving any admin consent request, ensure that the permissions granted to the application do not compromise your organization’s security. If any risky permissions are detected, do not grant admin consent. Always verify that the application comes from a trusted source. Note that customer-developed applications will typically appear as unverified.
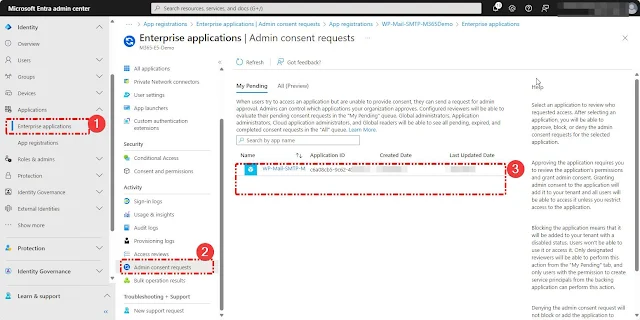
To approve the request, open the Entra Admin Portal, go to "Enterprise applications," and select "Admin consent requests."
Select My Pending or All to see the requestsSelect the request to view the details, including information about the app, who requested it, and options to review the permissions. You can choose to consent, block, deny the request, or review the application.Once you choose "Review permissions and consent," you will be prompted to log in. Select the Global Admin account to grant consent for these permissions.Once the sign-in is successful, the Permission Review page will open. There, review the permissions requested by the user for that particular application and choose "Accept" if you wish to grant consent.

Once the admin approves the consent, you will see the following notification on your Entra Admin Portal:
Now, return to Graph Explorer and click the "Consent" button you selected earlier. The consent will be granted for the user immediately, without any further verification.
As an admin, by navigating to the Entra ID> Enterprise Applications section, you can select the specific application, our case Graph Explorer then select Permissions to view the permissions that both users and admins have consented to. Additionally, you have the capability to revoke permissions and remove user assignments.
If you select the "Review Permissions" menu at the top, it will guide you through a set of actions that you can take against the application using PowerShell commands.
Please see the screenshot below.
To Add\Remove User\Group Assignments Select Users and Groups and then select the desired options
2. Without Admin Consent Workflow Enabled:
We've now disabled the Admin Consent settings while keeping the option to Allow User Consent for Apps turned on.
Below Screenshot shows the Tenant Settings Status:
Now, let's attempt to consent to the same Graph Explorer permission (`APIConnectors.Read.All`) that we accessed in our previous example, using the same user account. During the previous testing we have seen the Admin Consent request Page.
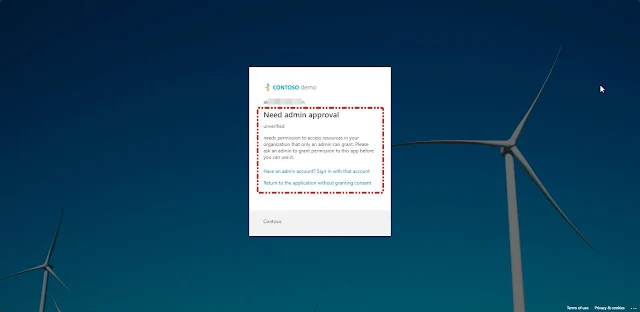
Once you click "Consent," you will encounter a page indicating "Need Admin Approval." This occurs because the specific permission (`APIConnectors.Read.All`) can only be granted by an admin, not by a standard user. Currently, the Admin Consent Workflow is turned off in our tenant, which is why it prompts you either to sign in with an admin account that has the permission to grant this access or to return to the application without granting consent. Without admin consent, the user cannot access this permission.
Allow user consent for apps from verified publishers, for selected permissions
In these settings, an admin can classify which permissions users can consent to from a verified publisher. However, it is important to note that only delegated permissions that do not require admin consent are supported in this arrangement.
The current user consent settings for the tenant are shown below.
Permissions classifications Shown below.
1.With Admin Consent Workflow Enabled:
Below Screenshot shows the Admin Consent Settings Status:
Let's proceed to register an application in Entra ID and check if a user can consent to the application. This will help us understand the expected behavior if a malicious actor attempts to breach a user using an unverified application(In our scenario, we are using an application that has been registered by an administrator for testing purposes.).
Note: It's important to recognize that a malicious actor could potentially use a verified application to obtain user consent to access their email and data. This type of access does not necessarily require admin consent, emphasizing the need for careful scrutiny of the permissions granted, even for verified applications.
In this test, we will use the WordPress WP Mail SMTP plugin to authenticate, grant the necessary permissions, and obtain a token on behalf of the Entra ID user through the Graph API.
To proceed, open Entra ID Admin Portal and navigate to Applications. From there, select App Registrations then Choose New Registration In the Register Application menu, we need to provide the application name and select the supported account types as "Accounts in any organizational directory (Any Microsoft Entra ID tenant - Multitenant)" and "personal Microsoft accounts (e.g., Skype, Xbox)." Next, we need Keep Platform as Web and enter the Redirect URI , which can be obtained from the WordPress Admin page under WP Mail SMTP settings.
Once completed, click on "Register."
The screenshot below illustrates how to retrieve the Redirect URI from the WordPress WP Mail SMTP plugin.
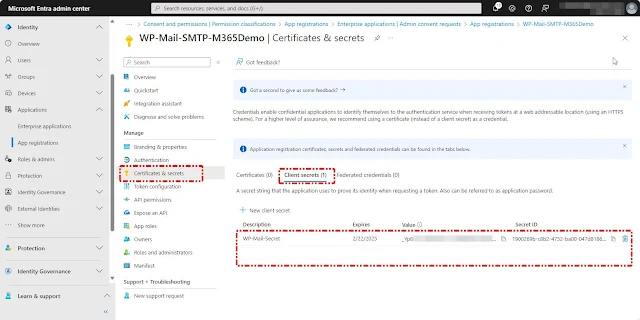
After registering the application, we need to obtain the application secret to bind with the WP Mail Plugin. To do this, select "Certificates & Secrets," then click on "New Client Secret." Enter a description, set the expiry, and choose "Add."
Credentials allow your application to authenticate as itself, requiring no interaction from a user at runtime.
Once you click the "Add" button, an application secret will be generated and displayed on the screen until you navigate away from the page. Be sure to copy the secret before it disappears, as you'll need to provide it in the WP Mail Plugin settings. You can get Application ID (Client ID) from the Application Overview PageThe Entra ID application setup is now complete. Next, we need to provide the Application Client ID and Secret in the WP Mail Plugin settings to establish the connection with Entra ID. To do this, navigate to the WordPress Admin Page and select "Settings."
This WordPress configuration is typically managed by your Application Team or WebApp Admin Team.
We have updated the Application ID (Client ID) and Secret in the WP Mail Plugin settings, as shown in the screenshot below.
Next, click the "Allow Plugin to Send Emails Using Microsoft Account" button to grant authorization with Microsoft Entra ID.
This is where user consent and admin consent play a crucial role.
Note: To grant this authorization, use an email-enabled account so that the application can send emails on behalf of that account. It’s important to use a standard email account rather than a privileged admin account.
Once we press the "Allow Plugin to Send Emails Using Microsoft Account" button, the page will be redirected to the M365 sign-in page and prompt us to initiate an Admin Approval request. The consent will be for the application permissions listed in the screenshot below.
Reasons for requiring Admin Approval, even though "Allow user consent for apps from verified publishers, for selected permissions" is enabled:
1. Unverified Application: The application requesting permissions is not a verified application, as indicated in the request screenshot.
2. High-Priority Permissions: Some of the permissions requested are high-privileged and not classified in our permission classification. These permissions always require admin approval.
3. Admin Consent Workflow: The admin approval request form appears because the admin consent workflow is enabled in our tenant.
Once Request is Submitted we will see the below page.
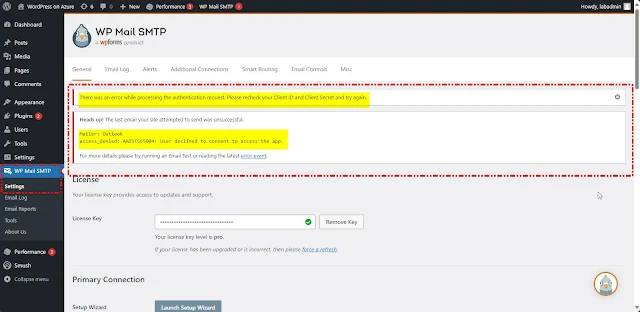
Once we select "Back to App," we will encounter the following error on the app side: "User declined to consent to access the app."
Now, let's review the request through the Entra ID Admin portal and approve it using an admin account.
Notes:
1. Approval email Notification also will be generated and send to Global Admin and Reviewer accounts
2.To review and act on consent requests, you must be designated as a reviewer. As a reviewer, you can view all admin consent requests but can only act on those created after you were assigned as a reviewer.
3. Reviewers can view, block, or deny admin consent requests. However, only Global Administrators can approve admin consent requests for apps requesting Microsoft Graph app roles (application permissions).
4.Granting tenant-wide admin consent requires signing in as a user authorized to consent on behalf of the organization.
To grant tenant-wide admin consent, you need:
A Microsoft Entra user account with one of the following roles:
- Privileged Role Administrator: For granting consent for apps requesting any permission for any API.
- Cloud Application Administrator or Application Administrator: For granting consent for apps requesting any permission for any API, except Microsoft Graph app roles (application permissions).
- A custom directory role that includes the permission to grant permissions to applications, for the permissions required by the application.
You can view the request under Enterprise Applications in Admin Consent Requests. Click on the My pending and choose the request to review it.
Select Review Permission and ConsentA new sign-in prompt will appear. Authenticate with your Global Admin account, review the permissions, and then click "Accept."With the consent now approved by the admin, go back to the application and check if it can access the services.
Open the WordPress Admin Page, navigate to the WP Mail SMTP plugin, and click the "Allow Plugin to Send Emails Using Microsoft Account" button. You will immediately see a banner stating, "You have successfully linked the current site with your Microsoft API project. Now you can start sending emails through Outlook."
2.Without Admin Consent Workflow Enabled:
Now, let's test the same scenario with Admin Consent Tenant settings disabled. I have removed all the admin consents that were previously granted for the WP Mail SMTP application for testing purposes.
Now Lets check WP Mail SMTP Authorization.We see a prompt indicating that "Admin Approval is Needed" without an option to request approval. At this stage, you need to contact the application owner to get the necessary permissions approved by an admin.
Do not allow user consent
1.With Admin Consent Workflow Enabled:
Configuring the "Do not allow user consent" setting with Admin Consent settings enabled means users must request admin approval for all application registrations with Entra ID.This configuration is considered one of the strongest settings for securing application access in the Entra ID tenant.
2.Without Admin Consent Workflow Enabled:
In this case We see a prompt indicating that "Admin Approval is Needed" without an option to request approval. At this stage, you need to contact the application owner to get the necessary permissions approved by an admin.Grant consent on behalf of a single user
In this section, you will learn how to grant consent for a single user using PowerShell.
When a user grants consent, the following occurs:
- A service principal for the client application is created if it doesn't already exist. This represents the application or service in your Microsoft Entra tenant.
- Delegated permission grants are created for each API the application needs to access, authorizing the application to act on behalf of the user.
- The user is assigned the client application, ensuring it appears in their My Apps portal where they can review and revoke access.
To grant consent on behalf of one user, you need a user account with Privileged Role Administrator, Application Administrator, or Cloud Application Administrator roles.
Configurations Steps
Before you begin, make sure to record the following details from the Microsoft Entra admin center:
- The app ID of the client application for which you are granting consent.
- The API permissions required by the client application, including the API app ID and permission IDs or claim values.
- The username or object ID of the user on whose behalf access is being granted.
For this example, we use Microsoft Graph PowerShell to grant consent on behalf of a single user. The client application is WP-Mail-SMTP-M365Demo, and we grant access to the Microsoft Graph API.
We have cleared all the previous permissions that were assigned during the earlier test. Kept only User. Read which is default.
To grant consent to an application on behalf of one user using Microsoft Graph PowerShell, you need to sign in as at least a Cloud Application Administrator.
Below Graph PowerShell code will do the job.
Open PowerShell and execute the code. Make sure to replace `<Your-Client-App-ID>`, `<User-UPN-or-ID>`, and the required permissions with your specific details.
# The app for which consent is being granted. In this example, we're granting access
# to a custom app.
$clientAppId = "<Your-Client-App-ID>" # e.g., "c6a08cb5-9c62-4531-81c0-e6c6752"

# The API to which access will be granted. Using Microsoft Graph API in this case.
$resourceAppId = "<Your-Resource-App-ID>" # e.g., "00000003-0000-0000-c000-000000000000"

# The permissions to grant. Replace with the actual permissions required.
$permissions = @("offline_access", "Mail.Send.Shared", "Mail.Send", "User.Read", "Mail.ReadWrite")

# The user on whose behalf access will be granted. Replace with the actual user.
$userUpnOrId = "<User-UPN-or-ID>" # e.g., "alert@abc.com"

# Step 0. Connect to Microsoft Graph PowerShell. Ensure the necessary permissions are granted.
Connect-MgGraph -Scopes ("User.ReadBasic.All Application.ReadWrite.All " + "DelegatedPermissionGrant.ReadWrite.All " + "AppRoleAssignment.ReadWrite.All")

# Step 1. Check if a service principal exists for the client application.
# If not, create it.
$clientSp = Get-MgServicePrincipal -Filter "appId eq '$($clientAppId)'"
if (-not $clientSp) {
   $clientSp = New-MgServicePrincipal -AppId $clientAppId
}

# Step 2. Create a delegated permission that grants the client app access to the
# API on behalf of the user.
$user = Get-MgUser -UserId $userUpnOrId
$resourceSp = Get-MgServicePrincipal -Filter "appId eq '$($resourceAppId)'"
$scopeToGrant = $permissions -join " "
$grant = New-MgOauth2PermissionGrant -ResourceId $resourceSp.Id -Scope $scopeToGrant -ClientId $clientSp.Id -ConsentType "Principal" -PrincipalId $user.Id

# Step 3. Assign the app to the user. This ensures the app is listed in the user's My Apps portal.
if ($clientSp.AppRoles | ? { $_.AllowedMemberTypes -contains "User" }) {
    Write-Warning ("A default app role assignment cannot be created because the " + "client application exposes user-assignable app roles. You must " + "assign the user a specific app role for the app to be listed " + "in the user's My Apps portal.")
} else {
    # The app role ID "00000000-0000-0000-0000-000000000000" is the default role
    # indicating the app is assigned to the user but not for any specific role.
    $assignment = New-MgServicePrincipalAppRoleAssignedTo -ServicePrincipalId $clientSp.Id -ResourceId $clientSp.Id -PrincipalId $user.Id -AppRoleId "00000000-0000-0000-0000-000000000000"
}
You will see that Microsoft Graph Command Line Tools is requesting admin consent to perform API calls necessary for configuring permissions for this application. Approve the consent with your Global Admin account. Once the consent is granted, the script will complete successfully.
Now, validate the permissions granted by the admin on behalf of the user by navigating to the Enterprise Applications, selecting our application, then choosing API Permissions and selecting User Consent.
The permissions specified in our PowerShell command will be reflected in the screenshot above. Once you select the Granted By field, you will see the user for whom the permission was granted. In our case, the admin granted the permission on behalf of the user, as there are scenarios where the user cannot grant certain permissions and only an admin can do so on their behalf.
Now, if you access the WP Mail SMTP application and attempt to authorize access with the same user for whom permissions were granted, the application can fetch the token without requiring additional admin consent or approval. This is because the permissions were granted by the admin through PowerShell(On behalf of user) before the user initiated the process from the application side.
The screenshot below shows the successful integration after supplying the Application ID (Client ID), secret, and user login. The application user/admin consent step was managed by the admin using PowerShell.
Conclusion
Navigating Admin and User Consent within Microsoft Entra ID is crucial for safeguarding organizational data. My exploration highlights the importance of balancing user autonomy with security protocols, especially in configurations that require admin approval for application access.
The most secure setting- Do Not Allow User Consent—requiring Admin Consent for all applications—minimizes risks associated with unauthorized data access and provides the highest level of protection by ensuring thorough administrative study before granting access to sensitive resources. This approach, while restrictive, prevents potential security breaches by unauthorized or malicious applications, reinforcing the organization's defenses against emerging threats.
Adopting stringent admin consent practices fortifies an organization’s security posture, ensuring that data remains secure within a robust IT infrastructure.










0 Comments