Step-by-Step Identity Migration Between Hybrid Entra ID Tenants in a Merger Scenario

Merging Microsoft 365 Tenants? Here’s How to Seamlessly Migrate Hybrid Entra ID Identities

Introduction

In merger and acquisition (M&A) scenarios, organizations often need to consolidate Microsoft Entra ID tenants while continuing to maintain separate Active Directory (AD) forests. This blog focuses solely on the identity migration process between two Microsoft 365 tenants with hybrid environments. The source and destination tenants each have their own AD forests. During the cutover, the custom domain is removed from the source tenant and added to the destination tenant. This guide walks through each step required to successfully migrate user identities while maintaining hybrid sync.

Current Setup Overview

In this lab scenario, we are simulating a merger between two organizations that operate independently with their own Active Directory (AD) forests and Microsoft 365 tenants. The objective is to migrate user identities from the source tenant to the destination tenant, maintaining separate AD forests and enabling hybrid identity.

Source Environment:
  • AD Forest: defender.local
  • M365 Tenant Domain: defender4.cloud
  • Hybrid Users: sunil@defender4.cloud, anil@defender4.cloud
Source M365 Tenant users

Source AD Domain


Destination Environment:
  • AD Forest: m365cloud.local
  • M365 Tenant Domain: acmebh.com
Destination Forest Domain

The following diagram highlights the current hybrid setup before initiating the migration process:

Source and Destination M365 Hybrid Setup

Note: This blog only covers identity migration. For migrating user data such as emails, files, and Teams content, you can use Microsoft native cross-tenant tools or third-party solutions such as BitTitan, ShareGate, AvePoint, or Quest.

How to Migrate Users and Data Between Microsoft 365 Tenants

Step-1 Identity Preparation Before Data Migration

Since this migration is happening in a hybrid environment, and we’re moving data from the source Microsoft 365 tenant—including Exchange Online, SharePoint Online, OneDrive, and Teams. we must first provision user identities in the destination tenant to facilitate the data copy.

However, you cannot add the source tenant’s custom domain to the destination tenant at this stage, as Microsoft enforces a restriction that a domain can be associated with only one M365 tenant at a time.

⚠️ Important Considerations:

  • Avoid Username Conflicts: Before creating accounts, conduct a thorough review of user UPNs and email addresses to ensure there are no naming collisions in the destination tenant.
  • Check Existing Users: If any usernames are already present under the destination tenant’s default onmicrosoft.com domain or an existing custom domain, those will block provisioning.
  • Temporary Domain Strategy: If conflicts arise, consider purchasing a temporary domain for initial user provisioning and data copy. This temporary domain will serve only during the transition period.

Once the source tenant’s custom domain is fully removed, you can reassign it to the destination tenant and update user UPNs and email addresses accordingly.

In our test scenario, we’re working with only two user accounts, and there are no naming conflicts with the destination tenant. Therefore, we’ll manually create these accounts directly from the Microsoft 365 Admin Center in the destination tenant.

For larger migrations: If you're dealing with a larger number of users, it's recommended to use PowerShell scripts or bulk provisioning methods (such as CSV import) to automate user creation efficiently.
Accounts have been created in the target Microsoft 365 tenant

As shown in the screenshot, the user account has been successfully created in the destination tenant and licensed accordingly.

Step 2: Data Migration

Now that the user accounts have been successfully created in the destination tenant, you can begin the data migration process using your preferred migration tool.

This step involves copying content from services such as Exchange Online, OneDrive, SharePoint Online, and Teams from the source tenant to the target tenant.

Important: The domain cutover timing will vary depending on the tool used, the volume of data, and the complexity of the migration. At this stage, it’s also crucial to monitor for and resolve any data integrity issues that may arise during transfer.
Commonly Used Migration Tools
  • BitTitan MigrationWiz
  • ShareGate
  • AvePoint
  • Quest Migration Manager

Each of these tools comes with its own prerequisites, features, and supported workloads. Choose the one that best fits your organization’s needs, and make sure to coordinate closely with your migration tool provider to plan this phase thoroughly.

Step 3: On-Premises AD & Entra Connect Preparation for Domain Cutover

Once the data migration is complete, you can begin planning for the domain cutover, which typically requires a full day. Before proceeding, ensure that the following prerequisites are in place to enable a smooth transition

1. Source and Destination AD Forest Network Connectivity

Establish reliable network connectivity between the source and destination Active Directory forests. This can be achieved through methods like site-to-site (S2S) VPN, ExpressRoute, or direct peering.
Goal: Ensure domain controllers from both forests can communicate with each other across the network.

Once connectivity is confirmed, proceed to establish DNS name resolution between the two forests.

2. Configure DNS Conditional Forwarding

To enable seamless name resolution between the forests, configure DNS conditional forwarding on both sides. This is essential for trust creation and domain communication.

For example, in our case:

  • Source Forest: defender.local
  • Destination Forest: m365cloud.local

 Configure each forest’s DNS server to forward queries for the other forest’s namespace to the appropriate internal DNS IPs.

Log in to the Domain Controller in each forest, then follow these steps:

  1. Press Win + R to open the Run dialog.
  2. Type dnsmgmt.msc and press Enter to launch the DNS Manager.
  3. In the DNS Manager console, expand the server node.
  4. Right-click on Conditional Forwarders and select New Conditional Forwarder.
Repeat this process in both the source and destination forests to enable bidirectional DNS name resolution.
DNS New Conditional Forwarder Destination Forest
Destination Forest M365cloud.local
Conditional Forwarders Record Added
Name resolution between the destination and source forests is now active
Destination forest DNS is now successfully forwarding queries to the source forest


Configuring Conditional Forwarder in the Source Forest

DNS New Conditional Forwarder Source Forest

3. Forest Trust Configuration Between Source and Destination Forests

Once DNS connectivity is successfully established between the forests, the next step is to configure a forest trust between the source forest (defender.local) and the destination forest (m365cloud.local).

Trust Setup Overview

A forest trust can be initiated from either forest's Domain Controller. There’s no need to log into both sides—by providing valid credentials from the other forest, the trust can be established from a single point.

Steps to Configure Forest Trust

Log in to a Domain Controller in either forest (in this example, we’ll proceed from the destination forest: m365cloud.local).

Press Win + R, type domain.msc, and press Enter to open the Active Directory Domains and Trusts console.
Active Directory Domains & Trust


Right-click your domain (m365cloud.local) and select Properties.
Domain Properties
Go to the Trusts tab and click New Trust.

New Trust

New Trust Wizard will open click Next to proceed
New trust Wizard

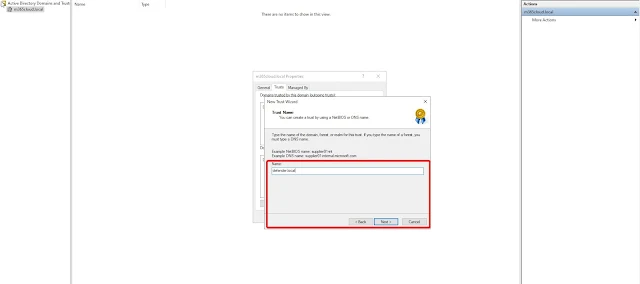
Enter the Trust Name using the NetBIOS or DNS name of the other domain. Click Next
Trust Name


In the Trust Type selection step, you’ll need to choose the appropriate trust type based on your organization's requirements. You can select either a Forest Trust or an External Trust. A Forest Trust is transitive, meaning it allows users in any domain within one forest to be authenticated by any domain in the other forest. This is ideal for scenarios where full interoperability is needed between multiple domains across both forests. An External Trust, on the other hand, is non-transitive and typically used for domain-to-domain connections, often in legacy or isolated environments. In our case, we will proceed with selecting Forest Trust to enable seamless authentication across both environments, and then click Next to continue with the configuration.
Trust type

The Direction of Trust window will appear next, where you'll need to specify how authentication should flow between the two forests. In our case, we’ll select Two-way, which allows users in both forests to authenticate with resources in each other's domains, enabling full bidirectional trust. Once selected click Next
Direction of Trust

The Sides of Trust window determines where the trust relationship should be created. You have the option to configure the trust on this domain only or on both domains. While it's possible to set up the trust on one domain and then repeat the steps manually on the other forest, it's more efficient to choose Both this domain and the specified domain. This allows the trust to be established on both sides in a single workflow, provided you have the necessary credentials for the remote forest.

Once confirmed will Click Next

Sides of Trust

Since we selected the option to create the trust on both this domain and the specified domain, you will now be prompted to enter the privileged username and password for the other forest. Provide the credentials of an account with sufficient administrative rights in the remote domain, then click Next to proceed with the trust configuration.

User Name and Password for Trust creation

Next, you'll need to choose the outgoing trust authentication level for the local forest. This setting determines how users from your forest will be authenticated by the remote forest. In our case, we’ll proceed with Forest-wide authentication, which allows users from any domain within the local forest to be authenticated in the trusted forest. This option provides broader access and is suitable for scenarios requiring full collaboration across forests.Click Next to continue 
Outgoing trust authentication level for the local forest

Now, you’ll need to configure the outgoing trust authentication level for the specified (remote) forest. Similar to the previous step, we’ll choose Forest-wide authentication, which allows users from any domain within the specified forest to be authenticated in the local forest. This ensures consistent access and trust behavior across both environments .Click Next to continue
outgoing trust authentication level for the specified (remote) forest

You will now see the Trust Selections Complete summary screen. Review all the configurations carefully to ensure everything is set as intended. Once validated, click Next to proceed with the trust creation.
Trust selection Complete

Next, you will be prompted to configure the Routed Name Suffixes for the specified forest. In our case, this will be defender4.cloud. Review the name suffix, ensure it's correctly listed, and then click Next to continue.

Routed Name Suffixes
Now, the wizard will display the Routed Name Suffixes for the local forest. Review the listed suffixes to ensure they are correct, then click Next to proceed.

Routed Name Suffixes for the local forest


The wizard will now display a confirmation message indicating that the trust has been successfully created for the remote forest. Review the details to ensure everything is correct, then click Next to continue.

Trust Creation Complete remote Forest


Next, you’ll see the Confirm Outgoing Trust prompt. Select Yes, confirm the outgoing trust, and then click Next to proceed with the trust validation.

Confirm Outgoing Trust prompt


Next, you’ll see the Confirm Incoming Trust prompt. Select Yes, confirm the Incoming trust, and then click Next to proceed with the trust validation.

Incoming Trust Validation

Finally, you’ll reach the Completing the New Trust Wizard screen. Review the summary, and click Finish to complete the forest trust configuration.

Completing the New Trust Wizard

The forest trust is now successfully established and active in both the source and destination forests. You can verify this from the Trusts tab within the Active Directory Domains and Trusts console on each domain controller.
Source forest Trust status


Destination forest Trust status

This trust enables secure identity recognition and resource sharing between the two environments—critical for hybrid coexistence and migration scenarios.

4.Domain Removal from Source Microsoft 365 Tenant

Once the forest trust has been successfully established, the next step is to remove the custom domain from the source Microsoft 365 tenant. However, before this can be done, you must first eliminate any dependencies associated with the domain within the source tenant.

This includes updating the domain name on all users, groups, and applications that are currently using the custom domain. In our case, we only have two hybrid user accounts that need to be updated.

Entra Connect Sync Users
Since these accounts are synchronized from the on-premises Active Directory, you cannot change their domain attributes directly from Microsoft 365. 

M365 User Change Domain


Change Domain Error

To address this, you have two options:

Option-1: Convert the accounts to cloud-only by stopping the Entra Connect synchronization. Once they're cloud-managed, you can update the domain from the Microsoft 365 Admin Center.

Converting all synchronized objects to cloud-managed accounts is a straightforward process using Microsoft Graph PowerShell.

Step 1: Install and Connect to Microsoft Graph
First, install the Microsoft Graph Authentication module and connect to your tenant:

Install-Module Microsoft.Graph.Authentication
Connect-MgGraph -Scopes "Organization.ReadWrite.All"

install the Microsoft Graph Authentication module

Graph Access Consent


Step 2: Check Current Directory Sync Status

To verify if directory synchronization is currently enabled, run the following command and review the OnPremisesSyncEnabled property:

Get-MgOrganization | FL *

Check Current Directory Sync Status

Entra ID Connect Sync Portal Status
Entra Connect Sync Status

Step 3: Disable Directory Synchronization

To convert all synchronized users to cloud-only, you need to disable directory synchronization at the tenant level. Start by retrieving your tenant ID:

$id = Get-MgOrganization | Select -ExpandProperty ID

Then, disable sync using this command:

Update-MgOrganization -OrganizationId $id -OnPremisesSyncEnabled:$False

Disable Directory Synchronization

Step 4: Confirm Sync Is Disabled

You can re-run the status check to confirm the change. The OnPremisesSyncEnabled property should now return a null value:

Get-MgOrganization | FL *
Confirm Sync Is Disabled

Entra ID Connect Sync Portal Status

Entra Connect Sync Status
Once directory sync is disabled, your users will be converted to cloud-only, allowing you to update their domain attributes directly in Microsoft 365.
M365 User Domain Change
 Since you’ll likely need to perform a final data migration to the destination tenant, it’s recommended to retain these accounts as cloud-only, using a temporary domain such as onmicrosoft.com, to avoid sync-related complications.

Option-2: Change Entra Connect User OU Sync Scope. Another way to convert specific users to cloud-only accounts is by changing the Organizational Unit (OU) synchronization scope in Entra Connect. By excluding the OU where the users reside, the corresponding objects will be deleted from Microsoft 365, allowing you to restore them as cloud-only accounts using a different domain name (e.g., onmicrosoft.com).

Steps to Update OU Filtering:

Open Microsoft Entra Connect on the synchronization server.
Select "Customize synchronization options" and sign in using your Global Administrator account.
Customize synchronization options


Click Next until you reach the "Domain and OU filtering" page.
Uncheck the OU containing the users you want to convert.
Domain and OU filtering

Click Next through the remaining steps and complete the wizard.

⚠️ No additional configuration is needed. After completing the steps, the selected users will be deleted from Entra ID during the next directory sync cycle. These users can then be manually restored as cloud-only accounts.

⚠️ Important: Always ensure that deleted users are successfully restored as cloud-only accounts before removing the custom domain from the tenant. If you remove user from directory sync and then immediately delete the domain, any attempt to restore users afterward may result in errors—such as Entra ID being unable to reconnect mailboxes to user accounts.

Removing the Custom Domain from the Source Tenant

To remove the custom domain from the source Microsoft 365 tenant, follow these steps:

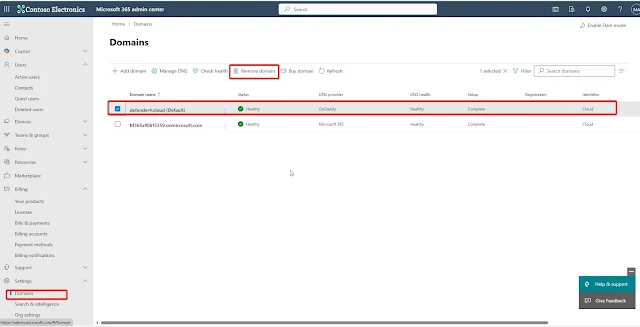
Navigate to the Settings tab in the Microsoft 365 Admin Center, then go to Domains.

Select the domain you want to remove.

Remove Domain
Before proceeding, ensure that another domain (e.g., onmicrosoft.com) is set as the default domain. Click "Set as default", then click Update and Continue.
set as the default domain
Once the new default domain is successfully applied, click "Remove domain".

Select "Automatically remove" to allow Microsoft 365 to handle the cleanup of dependencies.
Automatically remove domain
You’ll see a message indicating that domain removal is in progress, 
Domain Removal in Progress
and within a few minutes, the domain will be successfully removed.

Domain Removed

5. Destination Forest Entra Connect Setup – Connecting to Source Forest & Domain Configuration

Now that the domain has been removed from the source tenant, we can proceed to add it to the destination Entra ID tenant and configure Entra Connect to sync identities from the source forest.

Add the Domain to the Destination Tenant
  1. Go to the Microsoft 365 Admin Center in the destination tenant.
  2. Navigate to Settings > Domains and click Add Domain.
    Add Domain

  3. Enter the domain name (e.g., defender4.cloud), then follow the prompts to add the TXT record to your DNS provider for domain verification.
  4. Once the domain is verified, proceed to the next step.
Domains

Now, we need to update the cloud-only accounts—originally created in the destination tenant for the source forest users—to use the source domain (e.g., defender4.cloud). This step is essential because when Entra Connect starts syncing from the source forest, it will use attributes like UserPrincipalName (UPN) to perform a soft match.

Updating the UPN to match the on-premises account ensures that these cloud accounts are properly matched and merged with their corresponding on-prem AD identities, avoiding duplicate user objects in the destination tenant.

Cloud Only Accounts from Source M365 Tenant

Configure Entra Connect to Sync from Source Forest

On the destination Entra Connect server, open Microsoft Entra Connect and click Configure.
Entra Connect Sync Configure

Select Customize synchronization options and click Next.
Customize synchronization options

Sign in using Global Administrator credentials for the destination Entra ID tenant.
Sign in using Global Administrator credentials

On the Connect your directories page, click Add Directory and enter the source forest name (e.g., defender.local).
Connect your directories

Provide the credentials of a Source AD Enterprise Admin account.
Add Directory

Once verified, the forest and its schema will be added.Click Next
Directory Added

Continue Configuration
On the UPN Suffix Matching screen, choose Continue without matching all UPN suffixes.

You should now see the defender4.cloud domain marked as verified in the destination Entra ID tenant.
Entra Sign-in Configuration

Click Next and on the Domain and OU Filtering page, select the specific OUs you want to sync.
Domain and OU Filtering

Proceed with the default settings on the Optional Features page and click Next.
Optional Features

For Single Sign-On (SSO) setup, enter the credentials for an admin user from the newly added domain.
Single sign-on

Forest Credentials

Enable Single sign-on

On the Ready to Configure screen, review the summary and click Configure.
Ready to configure

Once completed, you’ll see a "Configuration Complete" message.
Configuration Complete

At this stage, Entra Connect in the destination tenant is now set up to synchronize user identities from the source forest, enabling hybrid coexistence and ongoing management.

Microsoft Entra Connect Sync Portal Status
Now we can see two domains configured for seamless SSO(Source & Destination)

Once the synchronization is complete, the cloud-only accounts in the destination tenant will be soft-matched with their corresponding user accounts from the source forest. As a result, all user attributes—including the local Active Directory password—will be updated on the matched accounts.
M365 Account Status

You’ll notice that the cloud-only account status changes to "Synced from Active Directory", indicating a successful match. Additionally, the Entra Connect Synchronization Service Manager will reflect this action by showing two 'Add' operations, confirming that the user objects have been integrated successfully.
Entra Connect Synchronization Service Manager

What's Not Covered in This Blog

A full treatment of device migration is outside the scope of this post. 
That includes:
  • Cleaning up Entra Hybrid Join records from source device.
  • Unenrolling from Intune and re-enrolling in the destination tenant.
  • Offboarding Defender for Endpoint from source and onboarding to destination.
These topics will be covered in a follow-up blog post.

Conclusion

By following these steps, you can achieve a seamless identity migration between Entra ID tenants while retaining separate AD forest management. This strategy allows for continued hybrid operations, minimal disruption to end users, and avoids the complexity of AD forest consolidation.
Stay tuned for Part 2 where we discuss the device-level migration process including Intune, Defender, and Entra Hybrid Join cleanup.

Post a Comment

2 Comments

  1. Hello,

    Next, will you be taking about what to do with the workstations? Cached credentials. Resetting workload apps.disjoining from hybrid andor going entra joined? Perhaps you want to include powersyncpro migration agent in this discussion? Have a chat with me Neil at powersyncpro dot com

    ReplyDelete
  2. Hi Neil,

    Thank you for your comment.

    I’ve already had a discussion with Anna and conducted a demo session of PowerSyncPro a couple of months ago in response to one of our customer requirements.

    ReplyDelete

Add