However, creating break glass accounts is only half the job. Monitoring and auditing their usage is equally critical to detect misuse or unauthorized activity before it becomes a serious incident.
In this blog series, we’ll explore:
- What a break glass account should look like
- How to monitor sign-ins and changes to these accounts
- Real-time alerting options using Entra tools and native Microsoft capabilities
What Is a Break Glass Account?
A break glass account is an unlicensed, cloud-only Global Administrator account, created solely for emergency recovery. These accounts:
- Are excluded from all Conditional Access (CA) policies
- Use strong, non-expiring passwords
- Are protected using phishing-resistant MFA like FIDO2 (YubiKeys)
- Should not be linked to any individual employee or daily use
- Use unique and non-obvious names like jewel@domain.onmicrosoft.com
- Should be part of Restricted Management Administrative Units to avoid accidental modification/deletion
Monitoring Break Glass Sign-ins
To detect any unexpected or suspicious use of break glass accounts, here are the monitoring strategies you should implement:
1. Use Entra ID Sign-in Logs
Go to Microsoft Entra Admin Center → Monitoring → Sign-in logs
Apply filters:
- Username contains = Break glass account(s)
- Authentication requirement = Single-factor authentication
- Conditional Access = Not applied (expected behavior)
This is a native Entra ID feature that allows you to check account sign-in status without any additional configuration. However, it doesn’t provide proactive alerts to administrators or the security team, you’ll need to manually review the sign-in logs in the Entra ID portal using appropriate filters.
2. Set Up Alerts with Log Analytics + KQL
In this method, all Entra ID sign-in logs and audit logs are sent to an Azure Log Analytics Workspace, enabling advanced analysis and the ability to configure custom alerts.
2.1 Prerequisites for Configuring Entra ID Log Monitoring
- An active Azure subscription – Required to create and manage the Log Analytics Workspace.
- Microsoft Entra ID Premium P1 or P2 license – Necessary to export sign-in logs. Without this license, the feature won’t be available.
- Security Administrator role – Needed to create general diagnostic settings for the Entra tenant.
- Attribute Log Administrator role – Required if you're configuring diagnostic settings for custom security attribute logs.
- A pre-configured log destination – Whether it’s Log Analytics, Storage Account, or Event Hub, the target destination must be created before configuring diagnostic settings.
2.2 Create a Log Analytics Workspace
In this step, you’ll set up a Log Analytics workspace, which will serve as the destination for your Entra ID sign-in and audit logs. Before you begin, ensure you have an Azure resource group available.
Sign in to the Azure portal with an account that has Security Administrator and Log Analytics Contributor roles. Navigate to Log Analytics workspaces.
Click Create.
On the Create Log Analytics workspace page, complete the following:Select the appropriate Azure subscription. Choose an existing resource group, or create a new one. Enter a unique name for your workspace. Select your preferred region.
Click Review + Create, then click Create.
Wait for the deployment to complete. You may need to refresh the page to view the newly created workspace.2.3 Configure Diagnostic Settings to Send Logs to Log Analytics
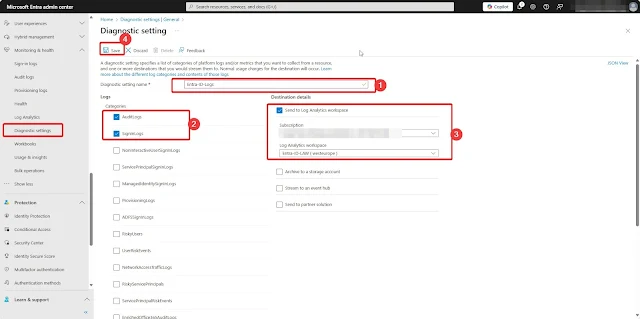
To begin streaming Entra ID sign-in and audit logs to your Log Analytics workspace, you’ll need to configure diagnostic settings. Since identity logs are managed through Microsoft Entra, it's important to perform these steps in the Microsoft Entra admin center.
Steps to Configure Diagnostic Settings: Sign in to the Microsoft Entra admin center with Security Administrator privileges. Navigate to Microsoft Entra ID > Monitoring & health > Diagnostic settings. Click Add diagnostic setting.
On the Diagnostic setting page: Enter a name for your diagnostic setting.Under Logs, select both Audit Logs and SigninLogs. Under Destination details, choose Send to Log Analytics, then select your previously created Log Analytics workspace. Click Save.
⏳ Note: It may take up to 15 minutes for logs to begin appearing in your Log Analytics workspace.
2.4 Run KQL Queries in Log Analytics
Once logs start flowing, you can analyze them using Kusto Query Language (KQL).
Steps to Query Logs: Go to Microsoft Entra ID > Monitoring & health > Log Analytics.
In the Search box, type your KQL query. Click Run to execute the query.
Example to Take 10 random entries from the input data: use the below KQL query.
SigninLogs | take 10
🔐 Minimum Role Required: The Reports Reader role is sufficient to run queries in Log Analytics.
2.5 Create an Alert for Break Glass Account Sign-ins via Azure Log Analytics
We will use the below KQL query to detect our Break Glass account sign-in
SigninLogs
| where UserPrincipalName == "jewel@m365x.onmicrosoft.com"
| where TimeGenerated > ago(5m)
The above query will Only show logs generated within the last 5 minutes.Query is working and now will create Alert Rule
Create an Alert Rule Click on the "New alert rule" button (above the query window).
In the "Create alert rule" blade:1. Scope: It should already be set to your Log Analytics workspace.
2. Condition: Under Condition, it shows “Custom log search”. Click Edit and ensure the query is your break glass KQL. Under Alert logic configure the below settings.Operator: Greater than
Threshold value: 0
Frequency of evaluation: 5 minutes
3. Action GroupIn the Action Group section, you’ll see three options: Quick Actions (Preview) ,Use existing action groups,None.
Choose Use action groups, then click Select action groups.
If no action group is available, click Create action group to set up a new one.
A new window will appear. In that window:
- Select your Subscription, Resource Group, and set the Region to Global.
- Provide an Action Group Name (e.g.,
BreakGlassAlert-Email). - Set the Display Name as
BreakGlass(note: limited to 12 characters).
Click Next: Notifications
Under the Notifications tab, you'll find multiple options such as Email/SMS message/Push/Voice.
In the Actions section, select Email, SMS(optional) as the notification method and enter the administrator's email address & Phone number
Note: SMS and voice alerts are only supported in a limited number of countries.
Repeat the above steps for each user who needs to receive notifications.Alternatively, if you're only using email, you can specify a distribution list that includes all relevant administrators.
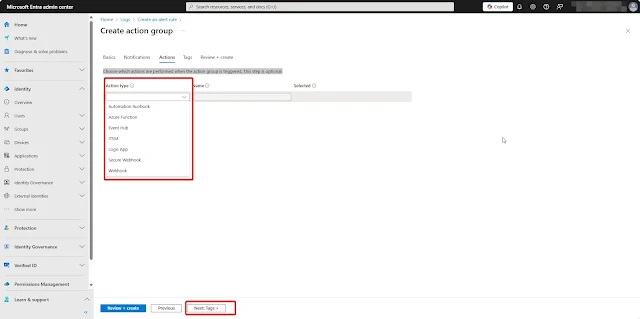
In the Actions section of the action group, you can optionally configure additional actions such as Azure Function, Automation Runbook, webhooks, Logic App, or ITSM.
Choose which actions should be performed when the alert is triggered,this step is optional based on your requirements.
Leave the Tags section empty unless you need to apply specific tags.
Then click Next, followed by Review and Create to finalize the configuration.
Now, the action group has been successfully created and is selected under the Alert rule actions section. Select Next to details Tab
4. Alert rule details
Name: Break Glass Account Sign-In Alert
Description: Alert for any sign-in by jewel@M365x.onmicrosoft.com
Severity: Sev-0 – Critical (you can also set to Sev-1 if required)
Enable alert rule upon creation: Select Review & Create
Review your configuration. Click Create alert rule.The alert rule has been successfully created and will now appear under the Alert Rules section within your Log Analytics Workspace.
A confirmation message will be sent to your mobile to enable SMS notifications. Once received, SMS alerts will be successfully activated.
A confirmation email will also be sent to the administrator's email address configured for the alert.
2.6 Break Glass Account Alert Experience
The following alerts will be generated if a Break Glass account sign-in is detected within 5 minutes of the login event.
Email Alert
SMS Alert
Alert History
You can view the alert history under the Log Search Alert Rule section.
Conclusion
This concludes Part 1/2 of our series on Monitoring Microsoft Entra ID Break Glass Accounts. In this part, we explored how to detect and respond to break glass account sign-ins using built-in Entra ID features, Azure Log Analytics, and real-time alerting mechanisms.
In Part 2, we’ll take this a step further by exploring advanced alerting methods—including integrations with Logic Apps, Microsoft Sentinel, and Defender for Cloud Apps, to build a more robust and automated monitoring framework.
🔎 “The most secure break glass account is the one that never signs in… unless it absolutely must.”
Final Thoughts
- Regularly validate and test break glass accounts, at least every 90 days
- Rotate credentials and verify sign-in and admin task functionality
- Keep the emergency process well-documented and ensure all relevant staff are trained
- Avoid tying MFA or SSPR to individual users’ personal devices
- Ensure MFA devices (like YubiKeys or secure phones) are redundant
- During routine audits
- After IT staff changes (departures, new hires, or role changes)
- Whenever your Entra ID or Azure AD subscription is modified


0 Comments