In Part 1, we explored how to monitor break glass accounts using native Entra ID tools and real-time alerting via Azure Log Analytics. That included KQL-based detection and alert rules for email and SMS notifications when break glass account sign-ins are detected.
In this second part, we take things to the next level by introducing automated and intelligent alerting using:
- Azure Logic Apps (Email, SMS, Teams integration)
- Microsoft Sentinel (SIEM-based detection & automated response)
- Microsoft Defender for Cloud Apps (MDCA) (Real-time cloud-based user activity monitoring)
These tools ensure that any break glass sign-in triggers an immediate and targeted alert, keeping your emergency access accounts secure and auditable.
Option 1: Alerting via Azure Logic Apps
What It Does:
Sends multi-channel alerts (Email, SMS, Teams) when a break glass account sign-in is detected—automatically triggered by a Log Analytics alert.
Step-by-Step: Configure Logic App Alert Workflow
Step 1: Create a Logic App
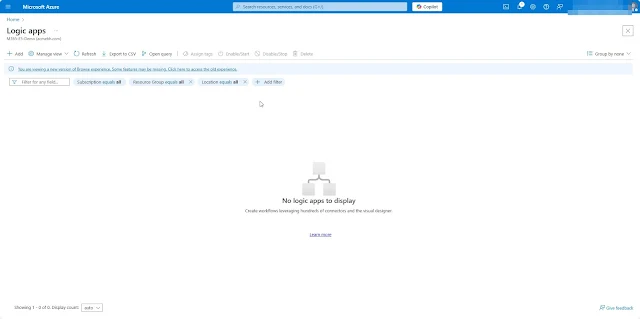
Go to Azure Portal → Logic Apps → Click + Create
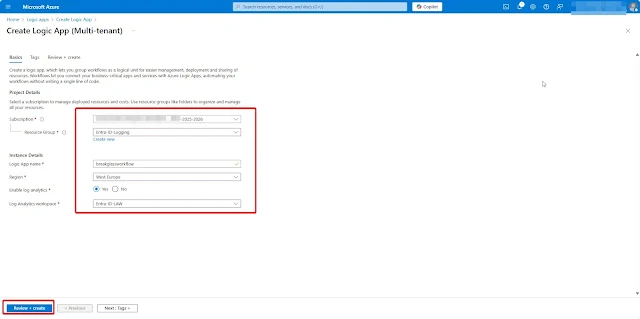
Choose a hosting option as required in my case i will go with shared Compute so i need to pay-per-operation
Choose your Subscription, Resource Group, Region, and name (e.g.,BreakGlassWorkflow)Click Review + Create → Create
Open your new Logic App → Select Logic app designer
Add a trigger Request
we will replace the name with : "When an Azure Monitor alert is fired" and then will keep all other settings default once we save the settings HTTP URL will be generated automatically
Now we saved the settings and HTTP URL has been created automatically
Step-3 Add Action to Run query and list results
This action allows you to run a Kusto Query Language (KQL) query on-demand against a Log Analytics workspace within a Logic App.
It's essential when: You want to pull real-time detailed sign-in data (e.g., UPN, IP, location) that isn’t available in the standard Log analytics alert payload.
The native alert only provides a high-level context (e.g., alert name and resource group), not user or sign-in details.
This is ideal for scenarios like:
- Getting contextual sign-in details for break glass accounts
- Enriching alerts with IP address, app used, location, etc.
- Fetching additional data that wasn’t part of the alert’s essentials section
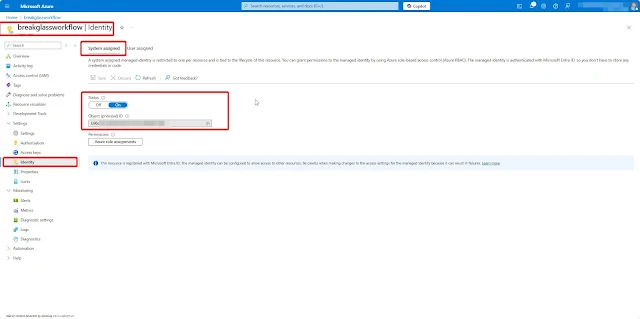
To retrieve sign-in log details using KQL from the Log Analytics workspace, you must enable the System-assigned Managed Identity for your Logic App. Navigate to the Identity section of your Logic App and switch the status to On.
Once the Managed Identity is enabled, the next step is to assign the required RBAC permissions to allow it to query sign-in logs using KQL from the Log Analytics workspace where your Microsoft Entra ID sign-in and audit logs are connected.
To do this, open your Log Analytics workspace, navigate to Access control (IAM), and assign the appropriate role. The Log Analytics Reader role is the minimum required permission to query data from the workspace..
Once the role has been assigned, return to your Logic App and open the Logic App Designer. Click Add an action, then search for Run query and list results under Azure Monitor Logs in the action tab.In the Parameters section, select the appropriate Subscription and Resource Group associated with the Log Analytics workspace you want to query.
For Resource type, choose Log Analytics Workspace, and under Resource name, select the specific workspace that is connected to your Microsoft Entra ID logs.
In the Query field, use the example below. This sample query is designed to retrieve sign-in activity specifically for a Break Glass account, including details such as UPN, display name, sign-in time, IP address, location, application name, authentication requirement, and Conditional Access status.
You can customize this query as needed based on your specific requirements: this is just a reference example.
SigninLogs
| where UserPrincipalName =~ "jewel@m365x0000.onmicrosoft.com"
| where ResultType == 0
| sort by CreatedDateTime desc
| project
UserPrincipalName,
UserDisplayName,
CreatedDateTime,
IPAddress,
Location = tostring(LocationDetails.city),
AppDisplayName,
AuthenticationRequirement,
ConditionalAccessPolicies = tostring(ConditionalAccessStatus),
Status = tostring(Status.errorCode)
| take 1
Step 4: Add Action to Parse JSON
The output from Run query and list results is a JSON array. To extract fields like UserPrincipalName, IPAddress,Location or AppDisplayName, you need to parse that output.
Parse JSON helps Logic Apps:
- Understand the structure of the incoming array
- Enable downstream actions (like emails,SMS or Teams posts) to access those values using dynamic content or expressions
- Avoid template validation errors due to raw or unstructured content
In short: without Parse JSON, you can’t reliably use the KQL output in your alerts or automation steps.
To parse the JSON output, click Add an action, then select Parse JSON under Data Operations.
In the Parse JSON action window, under Content, insert the below
@body('Run_query_and_list_results')
For the Schema, you can either upload a sample payload (by using the KQL query results) to automatically generate the schema, or manually paste the schema in JSON format.
Sample:
KQL Output
[
{
"UserPrincipalName": "jewel@m365x000.onmicrosoft.com",
"UserDisplayName": "Jewel John",
"CreatedDateTime": "2025-06-20T10:00:39.941661Z",
"IPAddress": "108.163.178.110",
"Location": "Al-Manamah",
"AppDisplayName": "Azure Portal",
"AuthenticationRequirement": "multiFactorAuthentication",
"ConditionalAccessPolicies": "notApplied",
"Status": "0"
}
]
Schema
{
"type": "object",
"properties": {
"type": {
"type": "string"
},
"items": {
"type": "object",
"properties": {
"type": {
"type": "string"
},
"properties": {
"type": "object",
"properties": {
"UserPrincipalName": {
"type": "object",
"properties": {
"type": {
"type": "string"
}
}
},
"UserDisplayName": {
"type": "object",
"properties": {
"type": {
"type": "string"
}
}
},
"CreatedDateTime": {
"type": "object",
"properties": {
"type": {
"type": "string"
}
}
},
"IPAddress": {
"type": "object",
"properties": {
"type": {
"type": "string"
}
}
},
"Location": {
"type": "object",
"properties": {
"type": {
"type": "string"
}
}
},
"AppDisplayName": {
"type": "object",
"properties": {
"type": {
"type": "string"
}
}
},
"AuthenticationRequirement": {
"type": "object",
"properties": {
"type": {
"type": "string"
}
}
},
"ConditionalAccessPolicies": {
"type": "object",
"properties": {
"type": {
"type": "string"
}
}
},
"Status": {
"type": "object",
"properties": {
"type": {
"type": "string"
}
}
}
}
}
}
}
}
}
Step 5: Add Alert Actions(Email, Teams, SMS)
Now lets add Multiple or single actions as required
You can now configure automated actions when a break glass alert is triggered ,such as sending an email, delivering an SMS, or posting a message in a Microsoft Teams channel.
To add a new action, click the + symbol and select Add an action.
If you need to trigger multiple actions simultaneously, choose Add a parallel branch instead.

In the Email body, I included the sign-in information parameters retrieved through the KQL query. These values were parsed from the JSON array and inserted into the message content accordingly.
Sample to fetch User Display Name : first(body('Parse_JSON')?['value'])?['UserDisplayName']
Additional data can be included based on your KQL query and its output, as needed.
Now, let’s add a Teams channel alert as a parallel branch to trigger both alerts simultaneously.
To do this, after the Parse JSON action, click the + symbol and select Add a parallel branch
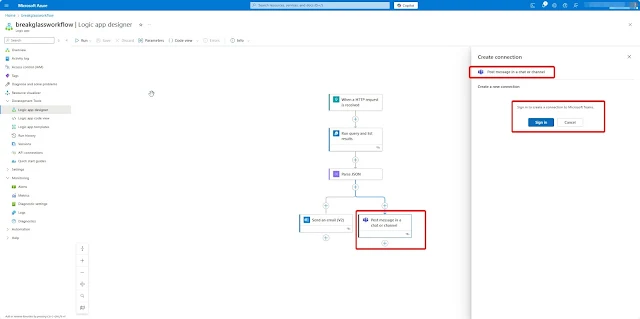
Search for Post a message in a chat or channel under Microsoft Teams.
You need to connect a Microsoft Teams-enabled user account that will be used to send messages to the channel. Ensure the account has an active Teams license and sign in to establish the connection.
Once Microsoft Teams is connected, set Post in to Channel, then choose your desired Team. In my case, I selected my SOC Team and the Alerts channel.
If your Team doesn't have a specific channel, you can select the General channel instead.
For the Message body, you can customize it as needed, in my case, I reused the same email body template.
Optionally, you can configure Advanced parameters such as the subject or include hosted content in a JSON array if required.
I’ll now show you how to add SMS alerts using a third-party SMS service like Twilio(You can use any SMS service provider from the supported list). You’ll need to purchase an SMS service from Twilio to fully enable this functionality. For demonstration purposes, I’ve created a Twilio account for integration, but I haven’t purchased a phone number, this example will only walk through the integration process.
After signing up for a Twilio account, you’ll receive an Account SID and Auth Token. Copy these credentials from your Twilio admin console, then go to your Logic App and add a new action to configure the Twilio connection.
Now, let’s return to the Logic App and add a parallel action to configure the SMS notification.
Add your Twilio Account SID and Auth Token to establish the connection between your Logic App and Twilio.
Once the connection is established, and if you have already purchased a phone number from Twilio, select it under From Phone Number. Then specify the To Phone Number and enter the Text message as required.
You can reuse the expression used earlier for the Text field, but ensure it does not exceed the character limit supported in a single SMS.
Once all actions have been added, click the Save button to save your Logic App configuration.
Step 6 Alert Rule Action Group Configuration
Now, let’s go back to the Log Analytics alert rule we created earlier, as mentioned in Part 1 of my blog.
We’ll use the same alert rule to trigger the newly enhanced Logic Apps workflow with the advanced customizations we just configured.
Open the Break Glass Alert Action group created in Part 1 and click Edit to proceed.
Remove the Email/SMS/Notification actions configured in Part 1, and instead, add a new action with the Action Type set to Logic App.(For details on configuring the Action Group and the Log Analytics native alert method, please refer to Part 1 of this blog.)
Save the ChangesStep 7 Test Break Glass Account Sign-in Alert
To test the Break Glass account sign-in alert, sign in using the Break Glass account and verify that notifications are received via email and the Teams channel.
Email Alert
Teams Channel Alert
Difference: Log Analytics Alert Rule vs. Logic Apps Query
|
Feature |
Log Analytics Alert Rule |
Logic Apps (Run query + Parse JSON) |
|
Trigger
Type |
Event-driven
(based on scheduled query match) |
Workflow-driven
(runs when triggered by alert or webhook) |
|
Scope |
High-level alert (limited fields) |
Full data retrieval with granular fields |
|
Data
Enrichment |
No enrichment
(limited to essentials) |
Custom
enrichment possible (via KQL + Logic) |
|
Customization |
Static alert
format |
Fully
customizable output (email, Teams, etc.) |
|
Use Case |
Detect that something
happened |
Retrieve what
exactly happened and act on it |
Option 2: Microsoft Sentinel Analytics Rule
Microsoft Sentinel is Microsoft’s cloud-native SIEM (Security Information and Event Management) and SOAR (Security Orchestration, Automation, and Response) solution, built on intelligent security analytics and threat intelligence.
It offers seamless data integration through both built-in and custom data connectors. For example, the Entra ID connector allows you to easily ingest Entra ID sign-in events into your Microsoft Sentinel workspace.
The Microsoft Entra ID built-in connector is the default option for collecting data from Entra ID into Microsoft Sentinel. It supports the following event types:
- Sign-in logs
- Non-interactive user sign-in logs
- Service principal sign-in logs
- Managed identity sign-in logs
- Audit logs
- Provisioning logs
Note: An Entra ID P1 or P2 license is required to ingest sign-in logs into Microsoft Sentinel.
Once data ingestion is complete, you can create an analytics rule to generate alerts for any activity related to Break Glass accounts.
To create a new analytics rule:
- Open Microsoft Sentinel (Contributor permissions or higher are required).
- In the Microsoft Sentinel panel, navigate to the Analytics blade under the Configuration section.
- Click + Create and choose Scheduled query rule to define your alert logic.
Fill in the following details for the analytics rule:
- Name: Enter a custom name (e.g., Break Glass Account Usage Alert)
- Description: Provide a clear explanation of the rule’s purpose
- Tactics: Select relevant MITRE ATT&CK tactics such as Initial Access, Credential Access, and Privilege Escalation
- Severity: Set to High
- Status: Set to Enabled
Next, configure the Rule logic.
Begin by defining the KQL detection query, which uses the SigninLogs table. The query extends fields such as IP address and UserPrincipalName for better context.
Detection is based on the Break Glass account UPN,
Sample KQL:
SigninLogs
| where UserPrincipalName == "jewel@M365x000.onmicrosoft.com"
| where TimeGenerated > ago(5m)
| where ConditionalAccessStatus == "notApplied"
| project TimeGenerated, UserPrincipalName, IPAddress, Location, AppDisplayName, AuthenticationMethodsUsed, Status
You can replace the UserPrincipalName in the query with your own Break Glass account.
For query scheduling, configure it to run every 5 minutes and look back over the last 5 minutes of data. You may adjust these intervals as needed based on your specific environment.
Ensure that incident creation is enabled for the analytics rule to generate alerts when a match is detected.
We will leave the Automated response section unconfigured for now. Click Next, then proceed to Review and create.
Review all configurations, then click Save to finalize the rule setup.
The rule has been successfully created and is now ready for use
Test Sentinel Alert
To test the alert, sign in using the Break Glass account and verify that an incident is generated under Microsoft Sentinel → Incidents.
By clicking on View full details, you can access comprehensive information about the incident and you can plan the action for this incident
Optional To display the incident in Investigation View, the investigation graph requires that your incident includes entities such as user, host, or IP address.Make sure to configure entity mapping when defining your analytics rule to enable this feature.
Option 3: Defender for Cloud Apps Activity Monitoring
Unlike the other methods discussed earlier, the Defender for Cloud Apps approach for monitoring Break Glass accounts does not require an Azure subscription, Log Analytics, Microsoft Sentinel, or Logic Apps.
If you have Microsoft 365 E5/F5, M365 E5 Security, M365 E5 Compliance add-ons, or a standalone Defender for Cloud Apps license, you can easily configure an activity alert for Break Glass account sign-ins.
Requirements:
- An active user account with at least an Exchange Online Plan 1 license (required to receive alerts).
- The Microsoft 365 App Connector enabled in Defender for Cloud Apps, with the Microsoft Entra ID sign-in events component connected.
- An active break glass account ( don't need any licenses )
Step-by-Step: Create a Break Glass Activity Policy in MDCA
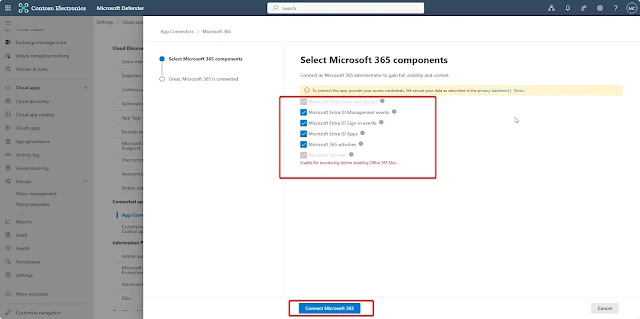
Before configuring the Break Glass account monitoring policy, you first need to connect Entra ID sign-in logs to Defender for Cloud Apps.
To do this, go to security.microsoft.com, navigate to Settings, and select Cloud Apps.
In the Cloud Apps settings, go to App connectors, select Microsoft 365, and click Connect to establish the integration.
Select Microsoft 365 Components and click connect Microsoft 365
Microsoft 365 is now connected. Please note that it may take some time for user and activity data to update and reflect in the portal.
Now, let’s configure the Break Glass account monitoring policy.
To do this, navigate to the Cloud Apps menu, select Policy Management, click Create Policy, and then choose Activity Policy.
In the Create Activity Policy menu, provide the following details:
- Policy Name
- Policy Severity (e.g., High)
- Category (e.g., Security or Access Control)
- Description – Add a brief explanation of the policy’s purpose.
For the policy filter, choose Create filter and set the trigger to Act on single activity.
Then, configure the activity matching conditions as follows:
- Activity type equals Logon
- User name equals your Break Glass account UPN
In the Alerts tab, select Send alert as email and specify the recipient email address. This can be an individual mailbox, a distribution list, or a Microsoft 365 Group that should receive the alert notifications.
Set the daily alert limit per policy—in this example, I’ve chosen 100.
Leave Governance actions unselected unless you plan to take automated actions.
Additionally, you can create a Power Automate playbook to trigger external workflows in response to this alert.
Select Create button to save the Policy
Now Break Glass account Activity policy is ready for Trigger
Test validate Defender for Cloud Apps Alert
To test and validate the alert, sign in using the Break Glass account.
If configured correctly, Defender for Cloud Apps will generate an incident based on the policy, and the specified user or group will receive an email alert triggered by the sign-in activity.
Email Alert:
Defender for Cloud Apps Incidents Page
The Incident page will display detailed information about the Break Glass account activity, including the public IP address, application accessed, and other relevant sign-in details.
Why Use MDCA for Break Glass Monitoring?
- Near real-time detection (A 2–4 minute alert delay is expected due to the time it takes for Entra ID sign-in activity to be ingested and reflected in Defender for Cloud Apps)
- No dependency on KQL or Sentinel
- Detects unexpected cloud activity like access to apps or file downloads
- Can monitor usage patterns across Microsoft 365, Salesforce, AWS, and more
Pro Tip
You can also use MDCA anomaly detection policies to monitor break glass accounts for:
- Impossible travel
- Unusual session length
- Access from unfamiliar locations
- Failed Logon also can be detected using Defender for cloud apps
Auditing Emergency Access Account Changes
Changes to the Break Glass account ,such as UPN updates, group membership modifications, addition\modification to restricted management administrative units, password resets, MFA re-registration, or role assignments, must be closely monitored, in addition to sign-in and failed sign-in activities.
To ensure comprehensive visibility, it is essential to also track and monitor Audit Logs for your Break Glass account.
1. Check Audit Logs
Microsoft Entra Admin Center → Audit Logs → Filter by:
- UserPrincipalName
- Activity Type: Update user, Add credential, Reset password, Assign role etc
2. Sample KQL Query for Change Detection
Conclusion
- Azure Logic Apps – for flexible, multi-channel alerts (Email, SMS, Teams)
- Microsoft Sentinel – for centralized detection, incident creation, and automated response
- Microsoft Defender for Cloud Apps (MDCA) – for near real-time behavior-based detection across cloud environments
“Break glass accounts are not just a safety net;-they're a last line of defense. Treat them like the crown jewels of your identity system.”
“Break glass accounts are not just a safety net;-they're a last line of defense. Treat them like the crown jewels of your identity system.”











0 Comments