In the dynamic world of cloud security, keeping up with user growth, new applications, and shifting access patterns can make Conditional Access feel like a moving target. While many organizations have solid Conditional Access policies in place, ensuring they’re always aligned with Zero Trust principles and Microsoft’s evolving recommendations is easier said than done.
That’s where Microsoft’s latest innovation steps in , the Conditional Access Optimization Agent, now supercharged with Microsoft Security Copilot.
What Is the Optimization Agent?
At its core, the Conditional Access optimization agent is a behind-the-scenes assistant built to help administrators answer a very critical question: "Are all users and apps in my tenant protected by the right Conditional Access policies?"Think of it as a smart compliance auditor combined with a remediation engine. It scans your existing CA policies, identifies gaps or overlaps, and suggests actions to strengthen your security posture ,all based on Microsoft’s best practices and learnings from across countless tenant configurations.
And the best part? You don’t need to guess what to do next. With one-click remediation and integration with Security Copilot, you're guided step-by-step on what needs to be done and why.
Why It Matters
Over time, even well-planned CA setups tend to get messy , multiple policies targeting the same users, legacy apps bypassing MFA, or gaps introduced as new teams and apps are onboarded. This agent automates the discovery of such blind spots and proposes precise, contextual fixes, helping security admins stay ahead without manually combing through every configuration.
It aligns beautifully with a Zero Trust model by pushing for:
- Mandatory MFA coverage
- Device-based access controls (e.g., compliance, app protection)
- Blocking legacy authentication
- Risk-driven conditional responses (Part of Entra ID P2)
- Policy consolidation to reduce clutter and overlap
Behind the Scenes: How It Works
The agent operates in two phases :- analysis and action:
Scanning & Analysis (Zero SCU cost)
- Scans existing Conditional Access policies
- Identifies coverage gaps (users/apps not protected)
- Reviews overlapping or redundant policies
- Avoids repeating previous suggestions
Suggestion & Remediation (Consumes SCU)
- Proposes new policies or updates to existing ones
- Suggests consolidating similar policies (differing by ≤ 2 conditions)
- Offers policy changes like:
- Enforcing MFA
- Applying device compliance or app protection requirements
- Blocking legacy auth/device code flow
- Adding protections for risky users or sign-ins (requires Entra ID P2)
All policy suggestions are created in report-only mode, and no changes happen without explicit admin approval , giving you full control with visibility.
Prerequisites & Roles
To get started, you need:- Microsoft Entra ID P1 license (P2 for risk-based scenarios)
- Available Security Compute Units (SCUs) each agent run is light, usually under 1 SCU
- Admin role access:
- Global Admin / Security Admin can run and approve
- Conditional Access Admins can also take actions when granted Security Copilot access
- Readers (Global/Security) can view suggestions but not act on them
Important: Avoid using PIM-activated accounts for enabling the agent, as this may cause authentication failures.
Limitations to Keep in Mind
While the tool is incredibly powerful, it's worth noting a few current constraints:
- Once started, the agent can't be paused or stopped
- Each run analyzes only four policy pairs for consolidation
- Suggestions aren’t customizable it’s based strictly on Microsoft’s logic
- Agent operates based on the last 24-hour snapshot of user and app activity
- Runs under the identity of the person who starts it
These limitations are mostly operational in nature and are likely to improve as the agent evolves.
Bringing It All Together with Security Copilot
The real game-changer here is how seamlessly this agent ties into Microsoft Security Copilot. This isn’t just a backend engine throwing alerts ,Copilot contextualizes suggestions, explains the rationale behind each action, and helps you weigh the impact before making a move.
This elevates the Conditional Access experience from reactive management to proactive, intelligent optimization , reducing manual effort, policy sprawl, and potential security oversights.
Setup CA Optimization Agent
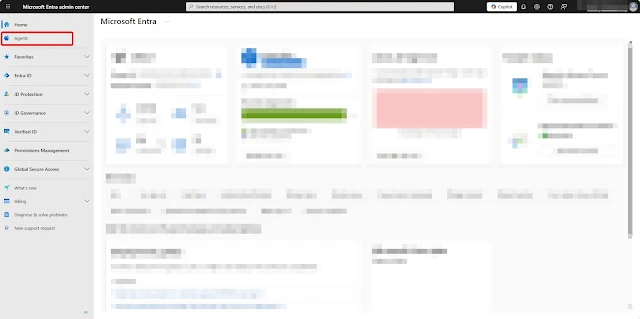
However, if you manually navigate to the Agents section from the left-hand menu, you’ll be presented with the following screen:
Setting up Security Compute Units (SCUs) is straightforward.
Head over to the Azure Portal, search for "Security compute capacities", click Create,
When creating a new capacity, simply give it a name, choose the evaluation location, and specify the number of SCUs per hour.
For this demo, I selected 1 SCU. You can also optionally configure overage capacity, which ensures you're covered during usage spikes.
Security Copilot uses both provisioned and overage SCUs:
- Provisioned SCUs are billed hourly.
- Overage SCUs are billed based on actual usage (accurate to one decimal).
Provisioning is flexible , you can scale SCUs up or down as needed with no long-term lock-in.
To handle unexpected demand, set an overage limit or leave it unlimited. This helps avoid service interruptions while keeping billing predictable.
Billing Insights
- Billing is based on hourly blocks, not exact minutes.
- Any SCU activity within the same hour counts as 1 full SCU (provisioned).
- Overage SCUs are billed per exact usage (e.g., 0.5 SCU), not rounded up.
Tip: To get the most out of each SCU hour, make provisioning changes at the start of the hour.
Example:
If you provision an SCU at 9:05 AM, deprovision at 9:35 AM, and start another at 9:45 AM you'll be charged for two SCUs for the 9:00–10:00 AM block.
Once you’ve filled in all the necessary details, simply click Review + Create to finalize the setup
Once the capacity is provisioned, you’ll find the compute unit listed in your chosen resource group.
Open the capacity, click “Go to portal,” and follow the prompts to complete the Security Copilot setup and related configurations.
When you navigate to securitycopilot.microsoft.com, you'll be guided to complete the setup process.
Since I had previously used Security Copilot and only deleted the SCU earlier, it now prompts me to select which capacity unit to associate with the service. I simply selected the one I just created.
You can navigate to the Agents either from the Security Copilot menu or directly by visiting the Microsoft Entra admin center.
The Agents section displays all currently available Microsoft agents in your tenant.
When you click on Conditional Access Optimization Agent (Preview), you’ll be redirected to the Microsoft Entra ID portal to begin the configuration process.
The first time you visit the Agents section in the Entra portal, you'll be greeted with a welcome screen introducing the feature.
Click View details on the Conditional Access Optimization Agent tile.
You’ll see a brief overview, including the trigger interval, required permissions, the identity used, and other relevant details:
- Product: Conditional Access
- Plugin: Microsoft Entra
- Access Roles: Security Administrator and Global Administrator
Tip: Avoid using an account that requires role activation via Privileged Identity Management (PIM) to prevent authentication issues.Once started, you'll see a message in the top-right corner:
"The agent is starting its first run."
The initial run may take a few minutes to complete.
After a few minutes, the Conditional Access Optimization Agent will update its status to “Complete” and display any recommendations or suggestions identified during the initial run. It will also show the next scheduled run time.
When the agent’s overview page loads, any findings will appear under the Recent suggestions section.
If a suggestion is listed, you can:
- Review the proposed policy
- Understand its potential impact
- Decide whether to apply the change
This makes it easy to take action with full context and confidence.
The Activities tab displays details of the current agent run. In my first run, no suggestions were generated.
The Summary tab provides a detailed view of the agent’s activity, including any steps taken during the run.
The Suggestions tab displays any recommendations identified during the agent run.
Once the agent is up and running, you can customize its behavior through the Settings page in the Microsoft Entra admin center. There are two ways to access these settings:
- Go to Agents > Conditional Access Optimization Agent > Settings
- Or, from Conditional Access, select the Optimization Agent card under Policy Summary, then click Settings
The agent is scheduled to run every 24 hours, starting from the time you first enabled it.
Want to run it manually? Simply toggle the Trigger setting off and then back on to kick off a new run instantly.
You can specify what the agent should monitor using the Objects section. By default, it watches for both new users and applications added in the last 24 hours. Adjust these checkboxes based on what you'd like the agent to prioritize in its policy recommendations.
- The agent runs under the identity and permissions of the user who enabled it.
- Avoid using PIM-based roles for enabling the agent. If the role isn’t active when the agent runs, the scan will fail.
- Users with Security Administrator or Global Administrator roles have access to Security Copilot by default. You can also explicitly grant access to Conditional Access Administrators.
- If a new group is created as part of a policy recommendation (e.g., to target specific users), the admin who approves the suggestion becomes the group owner.
- All audit logs for actions taken by the agent are linked to the account that started it. You can find this account listed under the Identity and Permissions section in the settings.
Want to tailor recommendations even further? Use the Custom Instructions field to guide how the agent applies policies. You can include or exclude specific users, groups, roles, or even object IDs.
Examples:
- Exclude users in the 'Break Glass' group from any policy that requires multifactor authentication.
- Exclude user with Object ID dddddddd-1111-2222-33333-fffffff from all policies.
The agent validates all object IDs, so you're always working with accurate inputs. You can even apply these instructions to specific policy types, like MFA requirements only.
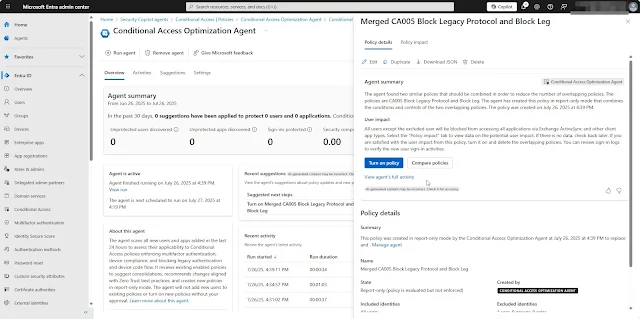
For testing purposes, I created a duplicate Conditional Access policy that blocks legacy authentication. After running the agent manually, a new suggestion appeared as expected.
Clicking on the suggestion opens a brief summary from the agent, along with details of the newly created policy corresponding to the duplicate Conditional Access policy in your tenant.
You’ll have the option to:
- Compare the new and existing policies
- Edit the agent-created policy
- Download the policy configuration as JSON
- Or delete the newly created policy if needed
This gives you full visibility and control before taking any action.
From the details panel, click on Policy Impact to view a visual representation of how the policy might affect your environment.
You can adjust the filters and display settings as needed. Selecting a point on the graph reveals a sample of data impacted by the policy.
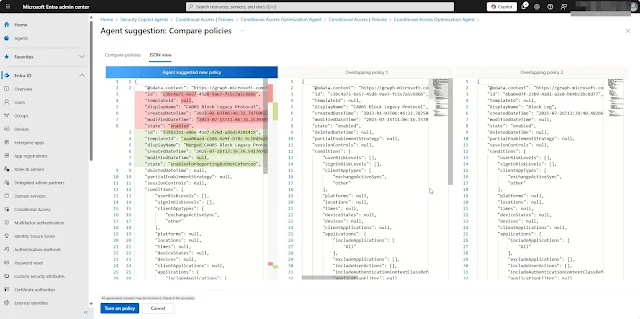
The JSON view displays the detailed configuration of the compared policies side by side.
If you navigate to the Conditional Access policies section, you’ll find the policy created by the Conditional Access Optimization Agent. The Created by column will indicate it was generated by the agent, and the policy will be in Report-only mode.
Additionally, the Alert column will display "New agent suggestion" to highlight it as a recent recommendation.
Final Thoughts
As organizations grow, security must keep pace. The Conditional Access Optimization Agent, powered by Microsoft Security Copilot, brings smart, scalable identity protection to your fingertips.
It’s not about adding more policies , it’s about adding the right ones, removing the clutter, and making sure every user and app is securely covered.
If you haven’t tried it yet, head over to the Entra admin center and give it a spin .your Conditional Access strategy will thank you.


0 Comments